How to enter the configuration code
Before we dwell on configuring the SM (entering a configuration code), we will dwell on why this is needed and what types of SM encodings still exist.
Everyone for the most part knows the “consumer” names of washing machines, in which manufacturers, using alphanumeric designations, reflect their main parameters - for which country or region it is intended, spin speed, maximum load of laundry, case material and color, tank material, layout ( vertical or horizontal loading of laundry), etc.
In reality (particularly for service departments) this is not enough. For each SM model (and its varieties) a different encoding is used. For Electrolux/Zanussi/AEG SM there are product (Prod. No or PNC) and serial numbers. They contain the necessary information for service departments - they can be used to find the necessary documentation and other information distributed by the manufacturer.
As for the configuration code, everything is somewhat more complicated here. Let's start with the fact that some types of electronic modules for Electrolux/Zanussi/AEG CMs (in particular, EWM2000) are supplied to service departments “not tied” to a specific model of washing machine. Entering the configuration code into the non-volatile memory of the electronic module provides the necessary “tuning” of the electronics. This is due to the fact that each SM model has its own characteristics (functionality and not always with a positive result), if the SM displays an error code from the E90 group.
Configuration consists of entering a hexadecimal 16-bit code from the SM control panel.
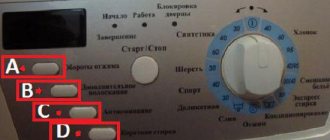
Using the example of a SM with a program selector, code is entered in the following sequence:
• activate the diagnostic mode (see above);
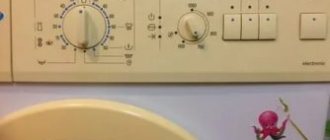
• turn the program selector knob one step counterclockwise (to the left relative to the OFF position, see Fig. 11);
Rice. 11. Switching the program selector knob one position counterclockwise
By pressing any of the mode selection buttons (one of seven, except START/PAUSE), the digit number of the configuration code is sequentially changed. In Fig. Figure 12 shows a change (increase) in the code bit number by one (A is the contents of this bit).
How to decipher error codes for Electrolux washing machines
Modern washing machines have a special function for recognizing problems in the system. These error codes are displayed on the display of the washing machine. Usually all these codes are described in the instruction manual. But in two or three years this book may be lost, and a problem may suddenly arise. See the photo for what the error message looks like.
Reviews
For the first time in my entire life I encountered a washing machine breakdown. The drum began to rattle, as if the washing machine was about to take off (Zanussi vertical). My sister knew a master and took his contact information. The man arrived and began asking what had happened, sadly looking at the machine, as if it had to confess everything to him and repent. He sat over her in sadness for almost an hour, periodically starting the drum, which, as luck would have it, either rattled in his presence or not. He said that he couldn’t help, that everything was fine with her, when, he said, she finally broke down, then he’d call her again. However, I only charged 300 rubles for leaving. Although for what reason is not clear. But I couldn’t refuse payment, I came.
During the next wash, the noise seemed to be loud throughout the entire house. I went looking for a specialist on the Internet, to be honest, not really hoping for success. And I came across the website of this workshop. We arrived, immediately explained the cause of the noise (the bearings needed to be replaced), and the repairman had the spare parts with him. The price was quoted before the repair, everything was done quite quickly. Even if it takes a long time, the main thing is that there is a result. In general, I'm satisfied. Thank you! I gave my sister your number.
When a professional works, it’s even nice to look at him. He asked in detail what was happening, quickly disassembled everything, examined it, gave the exact price of the repair along with a new part, took out the spare part, installed it, put everything back in place and left. It felt like all he did all day long all his life was dismantling and repairing washing machines just like mine (Samsung). If only such professionals worked everywhere! Modest, decent experts in their field.
From the words of my friends, I was sure that if the car was damaged, it would be easier to buy a new one than to find a proper repairman. But when this happened, for reasons of saving time and money, I still decided to try, and I was very lucky that I found the website of your workshop. True, we arrived only the next day, but for me this is not the main criterion. But they did it quickly, we had all the spare parts with us, the technician was very polite, showed us and explained the essence of the problem. The repair was inexpensive. So now I recommend a good master to my friends.
When the machine broke down, I didn’t think it could turn into such a quest. I don’t know anyone, so I started searching on the Internet. It turns out that in Nizhny you can repair household appliances from Moscow! You call the number 8 800..., and there’s just a dispatcher there, takes the order, and passes it on to the master in our city. It is no longer possible to control the work in this version, and the cost has to be kept high in order to pay Moscow employees. This scheme of work did not inspire confidence in me at all. Then he invited a master from the Nizhny Novgorod office. It turned out that the heating element had flown. The master had already disassembled the machine and wanted to start repairing it right away, so he was clearly angry when I asked to announce the cost of the repair in advance. The price for replacing the heating element was announced at 5500, although on the website it starts from 1000 and plus the heating element itself, according to him, is branded, 1500. And the rest is for disassembling and assembling the machine. On principle, I am not satisfied with this approach. Gave him 500 rubles. and sent him out.
As a result, it was important for me to communicate with the master before he arrived. I found Pavel’s phone number on the Internet. I explained the situation and heard the approximate cost over the phone. After the call, the master arrived literally two hours later, which was very pleasing. It took a little over an hour to replace the failed heating element. The price of the issue is almost two times less than the previous one. And most importantly, you know who to ask. Now I recommend it to everyone who faces such a problem.
Our case was clearly not an ordinary one. It all started with the spread of an unpleasant smell; they thought something was burning at the neighbors’ house. Then suddenly our washing machine stopped working. It seems that everything possible has broken in it (the machine is already 16 years old). Something happened to the wiring, as a result the board melted and the motor was covered. Since a couple of years ago we already contacted Pavel for minor drum repairs, this time we decided to call him right away.
The master warned that the repair would be long and expensive, because spare parts would need to be ordered. Therefore, I suggested making a decision: repair our machine or buy a new one. But in terms of money, buying a new washing machine was at least twice as expensive, so we decided to repair it.
A few days later Pavel arrived with all the spare parts, although the installation took several hours, but the result was worth it! The machine works great! Thank you very much to the master for his professionalism and honesty. And now there is a guarantee, which is very pleasing. Contact us, don't hesitate!
Diagnostic mode (DR) is a built-in function of ELECTROLUX washing machines with the EWM1000(+) control system. It allows you to check the performance of SM elements and components in selected operating modes.
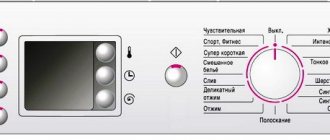
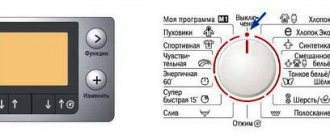
The front panels of the SM with this control system have two main versions of the panels: with horizontal and with vertical arrangement of control buttons.
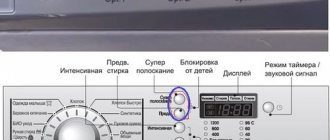
For a SM with a horizontal arrangement of control buttons, the order of entering the diagnostic mode is as follows:
- set the program selector knob to position “0” (OFF);
Rice.
1. Front panel CM ELECTROLUX with control system EWM1000
- On the front panel of the CM, simultaneously press and hold the START/PAUSE button and one of the option buttons, as shown in Fig. 1;
- turn the program selector knob clockwise to position 1 (see Fig. 1).
After this, the LED indicators on the panel should flash. This means that the SM is in diagnostic mode.
For a SM with a vertical arrangement of control buttons, the order of entering the diagnostic mode is as follows:
- set the program selector knob to position “0” (OFF);
Rice.
2. Front panel CM ELECTROLUX with control system EWM1000
- on the front panel of the CM simultaneously press and hold the buttons, as shown in Fig. 2;
- turn the program selector knob clockwise to position 1 (see Fig. 2).
If after this a beep sounds, it means the SM is in diagnostic mode.
Washing machine testing modes
Washing machines with the EWM1000 (+) control system have nine test modes, two of which are not used in this configuration (reserved).
Let's look at these testing modes in more detail.
Mode 1
This mode is intended to test the functionality of the SM user interface. It turns on automatically immediately after the machine enters diagnostic mode.
At this stage, you can check the functioning of the control buttons and indicators on the front panel of the SM: when you press a button, the corresponding indicator lights up (and vice versa). In addition, when such a test is carried out in a SM with a vertical button arrangement (see Fig. 2), a sound signal is heard.
Note that in this mode, other indicators that are not functionally associated with the corresponding buttons simply blink.
Mode 2
It is used to check the functioning of the water inlet valve into the main wash dispenser compartment. To turn on mode 2, move the program selector to position 2 (see Fig. 1 and 2). For normal passage the following conditions must be met:
— The SM must be connected to the water supply;
— the hatch door must be closed.
In this mode, the hatch is locked, and the water level is controlled by a pressure switch (level switch). A 5-minute pause is required before moving on to the next test mode.
Mode 3
It is used to check the functioning of the water inlet valve in the pre-wash dispenser compartment. To enable mode 2, the program selector is moved to position 3 (see Fig. 1 and 2).
The conditions for normal passing of the test and the procedure for activating the SM elements (locking the hatch and controlling the water level with a pressure switch) are the same as in mode 2.
A 5-minute pause is required before moving on to the next test mode.
Mode 4
It is used to check the functioning of the water inlet valves (main and prewash) through the additive dispenser compartment - water is injected through both valves simultaneously. To enable mode 4, the program selector is moved to position 4 (see Fig. 1 and 2).
The conditions for normal passing of the test and the procedure for activating the SM elements (locking the hatch and controlling the water level with a pressure switch) are the same as in modes 2 and 3.
A 5-minute pause is required before moving on to the next test mode.
Mode 5
This mode is not used in the SM with the EWM1000 (+) control system. It is designed to test machines with three water fill valves. To enable mode 5, the program selector is moved to position 5 (see Fig. 1 and 2).
Electrolux SMA error table: meaning and solutions
- Lack of pressure in the water supply.
- Fill system clogged.
- Inlet valve faulty.
- Failure of the module triac.
- Check the pressure in the water supply.
- Inspect the inlet hose. Perhaps he choked.
- Check the inlet valve windings. Replace if defective.
- Inspect the control module.
E21 (in some models C2)
- There is a blockage in the drain system.
- Pump malfunction.
- The electronic unit has failed.
- Clear the drain pipe, filter, and pump from blockages.
- Test the pump winding and replace if necessary.
- Inspect the control board.
To solve the problem, the control module is being tested.
A working triac is installed.
- pressure sensor failure;
- violation in the filling system.
- There is no water.
- Blockage in the water intake system.
- Damage to the pressure sensor (pressostat).
- Unscrew the shut-off valve and make sure there is water present.
- Clean the inlet hose and mesh filter.
- Clean the pressure sensor tubes, replace.
- Check the voltage in the network.
- Clean the sensor tubes from blockages and replace them if they malfunction.
- Inspection of the pressure switch.
- Installation of a working element.
- checking the level relay tube,
- clearing out clogs,
- its replacement.
The Hall sensor retaining washer is broken - it has probably slipped out of place.
- Reinstalling the washer.
- Installation of a new tachogenerator.
Inspection of the engine, installation of a new part.
- Checking and installing new wiring.
- Replacing the electric motor of a washing machine.
- Reinstalling the electronic board.
- Change of wiring.
- Checking the module and repairing it.
- Change the SM engine in case of malfunction.
- violation of the control chain;
- tachometer malfunction;
- breakdown; drive motor;
- electronic module malfunction.
- Checking and changing wiring.
- Installation of a new tachometer.
- Changing the SMA motor.
- Electronic board repair.
Launching self-diagnosis of SMA Electrolux. In normal mode, the code cannot be displayed.
The water did not have time to heat up in the allotted time.
- Damage to the heating element temperature sensor.
- Heating element malfunction.
- Checking the thermistor. Installation of a working element.
- Testing the heating element for damage and breakdown. Change of part.
- Short circuit of the temperature sensor or its contacts.
- Breakdown in the heating element body.
The fault code only appears in the CMA test mode.
The electronic unit has failed.
The recirculation pump has failed.
Damage to the thyristor of the electronic module.
Inspect the circuit board contacts and
EEPROM. Non-volatile memory power supply control.
- DSP failure.
- The connection between the DSP and the motor is broken.
- Replacing the electronic module.
- Connection control.
- Installing a new drive belt.
- Repair of connecting chain.
- Reinstalling the module.
- Replacing DSP.
- Close the drum.
- Install a new belt.
- Change DSP.
- Cleaning the drain hose and filter.
- Pump change.
- Cleaning the drain system.
- Control the use of detergent.
- Diagnostics of the drain pump.
- Wire repair.
- Installation of a working pump.
- Network check.
- Electronic board repair.
Call the master
A technician will come out for diagnostics and repairs upon prior request. You can make a call by phone or through the feedback form on the website. Provide the service manager with the following information:
The technician will tell you why the malfunction occurred and what to do only after visiting and inspecting the washing machine. Most breakdowns are fixed within 1-2 hours; removal of equipment to our service is not required. Immediately after the repair is completed, the washing machine will be ready for use. In rare cases, repairs may require more time and a return visit from the technician. We are ready to order any components and perform complex software repairs, but this often increases the work time.
All elements are working properly, but the error signal does not disappear
We figured out how to fix the problem. But sometimes a situation arises in which an error known to us can disrupt the operation of a washing machine for no reason. To be more precise, the problem still exists, but it is not related to the flow or drainage of fluid, and the units responsible for this function normally. It turns out that the machine is washing, but an alarm signal is displayed on the screen.
The reason for its appearance may be electronics. To be specific - the management block. It can fail for several reasons - from voltage surges, from frequent machine stops during the work process, from manufacturing defects, etc.
In this case, an experienced specialist will have to deal with this situation, since it is not recommended to dismantle and test the control unit module yourself if you do not have the appropriate skills for this.
Let's check the tachometer
The first on the list for diagnostics is the tachogenerator. To check it and, if necessary, repair it, you must first find the device. There will be no problems with this: for all washing machines, regardless of the brand, model and year of manufacture, the Hall sensor is located in the same place - on the motor shaft. You can access the device in a simple way.
We disconnect the washing machine from the network, disconnect the drain and water supply hoses. Prepare screwdrivers and a multimeter. Unscrew the back panel of the case. Remove the drive belt. We find an electric motor. Pay attention to the small metal ring on the motor shaft - this is the Hall sensor.
- We mark the wiring connected to the engine or record all the phases on the camera, otherwise there is a high probability of making a mistake in the connection during reassembly and burning the motor.
- Unscrew the screws holding the engine.
- With both hands we swing the engine from side to side, after which we sharply remove it from the seat. You should be prepared for the fact that the part is very heavy.
As soon as the engine and tachogenerator are in your hands, you can begin diagnostics. First, we carry out a visual inspection: for the presence of external mechanical damage and the reliability of the fastenings. Often the clamps in the terminals become loose or the contacts come loose, and the solution to the problem is to restore the previous balance.
If visually everything is in order, then testing with a multimeter is necessary. There are two ways to carry out the test. In the first case, we set the device to measure Ohms, after which we release the contacts and attach the probes to the exposed contacts. Next, we evaluate the numbers on the display: if a value of 60-70 Ohms is displayed, then the sensor is working properly.
Another option is to measure the current generated by the tachogenerator. To do this, turn on the “Voltage” mode on the multimeter, apply the probes and accelerate the engine by hand. If a value within 0.2 Volt appears on the screen, then the Hall sensor is working. Otherwise, we replace the faulty device with a new one.
Removing and checking the pump
You can get to the drain pump on modern automatic machines without disassembling the housing. To gain access to the pump, you should turn off the power to the washing machine, disconnect the equipment from the communication networks, remove any remaining water from the tank through the emergency drain pipe, remove the dispenser and place the machine on the right wall, having previously covered the floor with a rag.
This design feature simplifies repairs. On the other hand, the lower components may be damaged when carrying or transporting the equipment, or if they are exposed to debris and dust.
Some models of washing machines have a bottom, which is presented in the form of a lid. In this situation, it is also necessary to lay the equipment on its side and unscrew the bolts holding the bottom cover. Support the bottom with a flat-head screwdriver and pull off the lid. This will open access to the “insides” of the machine.
When an automatic machine is equipped with a protective system against emergency leaks, its design includes a tray with a water level sensor, which also must be removed. What should I do to gain access to the pump on such models? Have to:
- unplug the power cord of the washing machine from the outlet, disconnect the water supply and drainage hose;
- remove remaining liquid from the tank using an emergency drain hose or a garbage filter;
- move the machine to a place convenient for further work;
- remove the detergent dispenser;
- put the machine gun on its right side, covering the floor with a rag;
- using a slotted screwdriver, pull off the 4 latches holding the tray;
- Disconnect the wiring from the sensor attached to the pan and remove the container.
Having found the drain pump, you need to carefully inspect it. The main mistake of inexperienced craftsmen is the desire to immediately check the pump with a multimeter. In most cases, the problem is not the electrical part. The solution to the problem of a broken drain pump is often to clean it of debris, dirt, and hair accumulated inside.
The drainage system of automatic machines of any brand is designed in such a way that the majority of the debris that gets inside along with the items loaded for washing ultimately settles in the drain filter. However, even a small part of debris that gets on the pump impeller is enough to damage the pump.
The situation can be corrected by thoroughly cleaning the drain pump. If no particles of debris or dirt are found inside, test the element with a multimeter. If problems are found, a new drain pump must be installed.
If all attempts that you can do yourself are completed, and the washing machine still displays fault code E90, it is advisable to seek help from specialists. It is very difficult for an ordinary user to repair the system control module independently.
Share your opinion - leave a comment