Using an Ariston washing machine for a long time leads to bearing failure. This malfunction is indicated by extraneous noise that appears during the execution of the program and gradually increases, and during the spin cycle a very loud hum and knocking is heard. If such signs are detected, it is necessary to urgently replace the damaged part in order to prevent even greater damage and breakdown of more serious components. To do this, you can invite a service center representative, but if the user wants to save a significant amount of money, he can change the bearings on the Ariston washing machine on his own.
Causes of malfunction
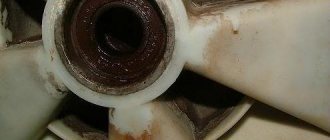
Typically, bearings work properly for six to ten years. But during regular use of the washing machine, the seal that seals the unit from moisture begins to deteriorate. It hardens, holes and cracks appear on it. Water enters the seat through the holes, which washes away the lubricant. This leads to significant friction and deformation of the bearing.
Improper use of equipment can also lead to bearing damage. Constant overload and resulting imbalance negatively affect the condition of the part. In addition, there may be a manufacturing defect, which will manifest itself over time.
If the owner of an Ariston washing machine hears a loud hum, knocking or other extraneous noise during washing, this indicates bearing deformation. To make sure of this, you should open the hatch and try to manually turn the drum. If the bearing breaks, a strong play will be felt. In this situation, it is recommended not to delay repairs, but to urgently replace the faulty bearing. Delay threatens failure of the shaft or other expensive components of the washing machine.
Preparing to replace bearings
To replace the bearing in an Ariston washing machine, the equipment must be disconnected from the water supply, sewerage and network, and then moved to a place convenient for work. You will also need to drain the remaining water, this can be done through the emergency drain hose. It is located in the lower front part of the washing machine, under the decorative panel. If it is missing, you can drain the liquid through the filter located there. Taking this opportunity, the part can be cleaned of debris and dirt that may have accumulated there over the years of operation.
Next, tools and spare parts are prepared. To carry out the work you will need:
- set of flat and Phillips screwdrivers,
- bit,
- pliers,
- set of socket wrenches,
- WD-40,
- silicone sealant,
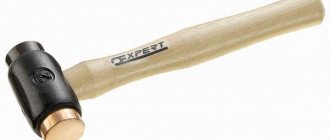
- mallet or hammer.
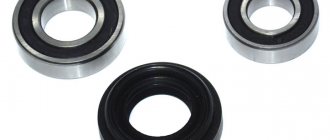
New bearings and seals (they will also need to be replaced) can be purchased at a service center or in a specialty store, or ordered online. Parts should be purchased in accordance with the model and brand of the Ariston washing machine.
Causes and symptoms of bearing wear
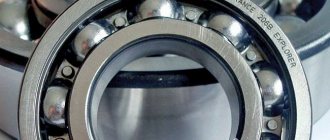
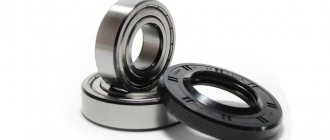
The bearing consists of two rings of different diameters with balls in the space between them - due to this, they rotate relative to each other. The bearing is needed to rotate the washing drum, so the load on it is heavy. The part is protected from water by an oil seal - a rubber seal; its tightness is extremely important for the “health” of the bearing.
The oil seal can be damaged due to water hardness, detergents and other unfavorable factors. If its integrity is damaged, water gains access to the bearing - the balls between the rings begin to rust. That is why the first symptom of bearing wear is creaking and whistling during the washing process. A problem may also be indicated by slow rotation of the drum and play between it and the tank. If you do not start repairs at this moment, the condition of the part will only worsen further - when the bearing crumbles, the drum will stop rotating.
The service life of the part is 6-10 years, it all depends on the brand of the washing machine and its operating conditions. Some factors can cause it to wear out quickly:
- load of laundry exceeds the permissible norm. If you overload the drum, the load on the bearing increases;
- hard water and detergents. They change the composition of the water surrounding the drum and seal, which can cause damage to the seal surface;
- too frequent washing. This is especially true for new washing machines - there should be an interval of several hours between washes.
Replacing bearings in an Ariston washing machine is not an easy task; you will have to disassemble almost the entire washing machine. It is difficult for a beginner to do this, but with due attention it is quite possible. Before starting repairs, you need to find a new part, because the old bearing is no longer suitable.
Disassembling the Ariston washing machine
When disassembling the Ariston washing machine, it is recommended to photograph the equipment before removing each part, especially before disconnecting the wiring. This will avoid incorrect actions and prevent equipment breakdown as a result of improper assembly.
To disassemble the Ariston washing machine, you need to follow these steps:
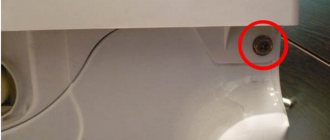
- Unscrew the screws holding the top cover, slide it back, remove it and put it aside.
- Unscrew the bolts and disconnect the upper counterweight.
- Unscrew the fasteners and remove the back cover.
- Carefully rotate the pulley wheel and remove the drive belt.
- Pull out the detergent drawer and unscrew the fasteners behind it that hold the control panel.
- Several more screws hold the panel from the inside of the Ariston washing machine; you need to unscrew them, carefully release the latches, then, after photographing the connection, disconnect the wires and move the panel to the side.
- Disconnect the pipe leading to the reservoir from the detergent compartment and the inlet valve.
- Remove the hose leading from the pressure switch to the tank.
- Remove the niche for the powder receptacle.
- Open the hatch, pry up and remove the clamp, disconnect the cuff.
- Unscrew the fastener and remove the hatch locking mechanism.
- Unscrew the fasteners and remove the hatch door.
- Remove the lower decorative panel on the front part, unscrew the fasteners under it and in the upper part, and remove the front wall.
- Disconnect the wires going to the heating element and motor.
- Pull out the engine.
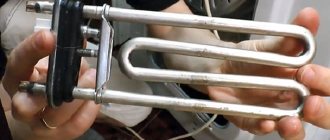
- Remove the heating element.
- Disconnect the lower counterweight.
- Remove the shock absorbers and suspension springs.
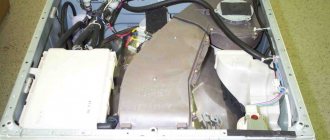
- Pull the tub up and out of the washing machine.
Disassembling the tank
To get to the drum and replace the bearings, you will need to disassemble the tank. The sequence of actions is as follows:
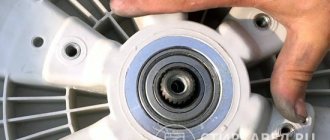
- Turn the water tank over with the pulley facing up, block the pulley from turning with a screwdriver or metal rod, and unscrew the fastening bolt. If it does not turn, lubricate it with WD-40, wait a little, then repeat the steps.
- Disconnect the pulley; underneath there is a shaft. To knock it out, you need to find a bolt similar to the fastening one, screw it into the shaft and carefully knock out the shaft with a hammer at a right angle.
Now you need to disassemble the tank. In different models of Ariston washing machines, it can be collapsible (two halves are bolted together) or non-separable (two parts are soldered at the seam). In the first case, you just need to unscrew the bolts, in the second, use a hacksaw and cut the tank along the seam. You should first prepare the bolts that will be used to twist the tank after replacing the bearing and drill the corresponding holes along the seam. These steps can be performed after the tank has been sawed, but it will be a little more difficult.
After the tank is disassembled and separated into two halves, you need to pull out the drum.
Replacing bearings
Before replacing bearings, the shaft and bushing must be inspected for damage. If they are significantly damaged, they need to be replaced with new ones, otherwise the Ariston washing machine will require new repairs in the near future. If they are intact, they should be cleaned of dirt and rust. To clean the shaft, you can use fine sandpaper; for the bushing, it is better to choose a soft sponge or rag.
It is also necessary to check the integrity of the crosspiece, with which the shaft is attached to the drum. If it is damaged, it will need to be replaced along with the drum.
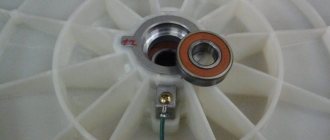
Now you need to knock out the bearings, you should start with the outer one. It is necessary to turn half the tank upside down and, using a chisel and hammer, remove the part. Apply blows correctly on the outside of the bearing, evenly in a circle; you must act with extreme caution so as not to break the seat. After completing the process, the part must be turned over and the internal bearing must be knocked out in the same way.
Next, you need to lubricate the sockets with WD-40, wipe off dirt and rust, wipe dry, apply a special lubricant and drive in the bearings one by one - first the internal, then the external. The parts are driven in with blows on the outside and evenly in a circle, while ensuring that there is no distortion. Next, you should install the seals.
Causes and symptoms of bearing wear
The bearing consists of two rings of different diameters with balls in the space between them - due to this, they rotate relative to each other. The bearing is needed to rotate the washing drum, so the load on it is heavy. The part is protected from water by an oil seal - a rubber seal; its tightness is extremely important for the “health” of the bearing.
The oil seal can be damaged due to water hardness, detergents and other unfavorable factors. If its integrity is damaged, water gains access to the bearing - the balls between the rings begin to rust. That is why the first symptom of bearing wear is creaking and whistling during the washing process. A problem may also be indicated by slow rotation of the drum and play between it and the tank. If you do not start repairs at this moment, the condition of the part will only worsen further - when the bearing crumbles, the drum will stop rotating.
The service life of the part is 6-10 years, it all depends on the brand of the washing machine and its operating conditions. Some factors can cause it to wear out quickly:
- load of laundry exceeds the permissible norm. If you overload the drum, the load on the bearing increases;
- hard water and detergents. They change the composition of the water surrounding the drum and seal, which can cause damage to the seal surface;
- too frequent washing. This is especially true for new washing machines - there should be an interval of several hours between washes.
Replacing bearings in an Ariston washing machine is not an easy task; you will have to disassemble almost the entire washing machine. It is difficult for a beginner to do this, but with due attention it is quite possible. Before starting repairs, you need to find a new part, because the old bearing is no longer suitable.
Assembling a tank and washing machine Ariston
After the bearings have been replaced, you need to start assembling the tank. The seams of the two halves should be carefully treated with silicone sealant, then aligned and bolted together.
The Ariston washing machine is assembled in the reverse order; if the user took photographs during disassembly, then in accordance with them. It is recommended to be especially careful when connecting the wiring.
After the washing machine is assembled, it should stand for the time required for the sealant to completely harden. After this, you need to connect it to communications and electricity, pour in a little washing powder and perform a test wash. This way, the equipment will be cleaned of any remaining dirt, grease and unpleasant odors that remained inside after the repair. At the end of the program, you need to look under the washing machine and make sure that no moisture has formed under it.
If no extraneous noise was observed during the work and the equipment does not leak, this indicates that the repair was completed successfully.
To prevent future breakdowns, you must use the Ariston washing machine carefully, avoid overloading, and distribute voluminous laundry evenly. This will significantly extend the life of the bearings.
Sequence of assembling the washing machine
After you have managed to change the bearings and oil seal, you need to return all parts of the machine to their original position, in the reverse order of the one used to disassemble the equipment:
We install the pulley using an asterisk; after installation, you need to check the ease of rotation of the drum; Degrease the sections of the two sawn halves of the tank using white spirit, carefully cover the sections of both parts with sealant, bypassing the holes for the bolts, connect the two parts without pressing, insert the bolts into the previously prepared holes. The bolts should be tightened sequentially: bottom, top, side
Some of the sealant should squeeze out after the bolts are tightened, it is important not to overtighten them; In increments of 6-7 cm, mark the points with a soldering iron and make shallow holes so that the plastic does not crack when screwing in the screws. Screw in the screws with a screwdriver
Next, you need to wait until the sealant hardens. The average time for sealant to harden is approximately a day; After a day, you can continue the assembly. First you need to attach all the parts related to the tank and then install the tank in place, hanging it in the housing on springs. When disassembling and assembling the machine for the first time with your own hands, photographs taken during disassembly will be an excellent help; they will help you navigate the location of wires and pipes; After the tank is installed in the body, we assemble all the other parts of the model. We use the reverse sequence. We carefully check the assembly with photographs, if they were taken at the disassembly stage.
At the final stage, you need to check the build quality. To do this, we run a test wash. At this stage, it is recommended to leave the back wall untamed to ensure that all connections are tight.
It is necessary to observe for leaks; if even drops of water are noticed, you will have to look for the source of the leak and carry out repairs again. At the spin stage, we check the operation of the drum, the smoothness of its movement and the absence of shaking.
The approximate duration of repairs associated with replacing bearings, which requires connecting halves of the tank, will in any case be more than a day, so it will not be possible to restore the operation of the equipment in one day. However, if the work is done efficiently and accurately, after repairing it yourself, the machine will last for many years.
To avoid breakdowns in the future, it is important to remember that the load of laundry into the drum should, if possible, not be full, and the weight of the laundry should comply with the standards for this model. Partial loads will help prevent breakage, and at the same time the laundry will be washed and rinsed better