Where can an electric motor be used?
Craftsmen have come up with dozens of options for using a motor from an old washing machine. But they all have the same concept - using the engine torque to start the operation of additional mechanisms . The following options are considered the most popular homemade products.
- Grinder. To do this, the motor is firmly fixed to a solid base and the grinding wheel is connected to the shaft. All that remains is to connect the washing machine motor to the network and you can start sharpening knives, axes, and scissors.
- Concrete mixer. Not only electricity is taken from old technology. the engine, but also the drum. With a little modification, you will get an excellent construction tool that will save a lot of money and time. Some craftsmen can even make a deep vibrator.
- Mill or crusher (feed cutter). This homemade product is suitable for people living in rural areas and raising livestock.
- Vibrating table Connecting an electric motor to the countertop will provide an inexpensive tool for making paving slabs or cinder blocks.
But before you start disassembling your washing machine, you should find out the type of electric motor you have. This will allow you to determine the scope of its application and the method of starting from the mains.
Types of engines
Important! There are only three types of motors installed on washing machines: asynchronous, commutator and direct (inverter).
Asynchronous
An asynchronous motor was installed in cars produced in the USSR (Riga-60, Vyatka-automatic). It consists of two parts: stator and rotor. The motor got its name due to its inability to rotate synchronously with the magnetic field (it constantly lags behind). There are two options for an asynchronous motor: two- and three-phase. Older models (for example, Riga) had two-phase motors installed. But with the advent of the new millennium, such engines almost ceased to be produced.
Asynchronous motor of the washing machine Vyatka
The main advantages of an asynchronous motor:
The disadvantages of the electric motors of the Donbass washing machine and other older models are their dimensions, high electricity consumption and difficulty in setting them up.
To remove an asynchronous motor (for example, from a Malyutka washing machine), you will have to disassemble the entire housing. Then loosen the motor mounts, remove the belt and disconnect the retaining ring. After this, all that remains is to remove the pulley from the shaft and disconnect the electrical wires from the clamps.
Electric motor of the Malyutka washing machine
Collector
The commutator electric motor gradually began to displace the asynchronous motor from the household appliances market . The main advantage of its design is the ability to operate on both alternating and direct current . The rotation speed of the rotor directly depends on the applied voltage. In addition, such motors are capable of rotating in both directions. Commutator motors are found in most household appliances. So, they can be found in washing machines of the following models: INDESCO, CESET, WELLING, SELNI, FHP, SOLE, ACC.
The strengths of this device are:
- a large number of revolutions;
- smooth speed increase;
- compactness.
Weaknesses include a short lifespan.
Important! Often such motors break down due to an interturn short circuit, that is, the contacts on the rotor and commutator touch. Therefore, the magnetic field is weakened and the drum stops rotating.
Inverter
The direct (inverter or brushless) type of electric motors is found only in modern models of washing machines (for example, Indesit). This technology hit the market just ten years ago. Unlike the previously mentioned designs, the motor is connected to the drum directly, without the use of intermediate parts.
The advantages of an inverter motor include:
- long service life;
- wear resistance;
- compactness.
The main disadvantage is the high cost of production, which seriously affects the price for the user of the final product.
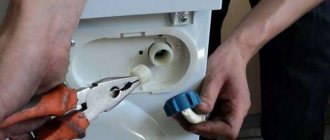
To remove the electric motor from a modern washing machine, you need to remove the back (typical of Indesit, Zanussi, Ariston) or front (typical of Samsung, Bosch, LG) panel. If you only need to unscrew the bolts on the back wall, then from the front you will have to remove the control panel, base and top cover. The engine will be located at the bottom of the machine. To dismantle it, you need to remove the drive belt and disconnect the grounding and power wires. Next, you need to unscrew the motor mounts and remove the device by picking it up with a thin object. If all the screws are unscrewed, then you can use a little force, since the fasteners often stick.
WE REPAIR “VYATKA-AUTOMAT”
One of the most common reasons leading to the failure of the Vyatka-automatic washing machine is the failure of the electric motor winding (EM) in the control device drive. In repair shops, such a malfunction is usually eliminated by replacement. Moreover, they prefer to deal not with updating a burnt-out cheap winding or even with a “moody” electric motor, but with an expensive command apparatus (CA), in which all this is located as a “monolith” that cannot be disassembled.
A complex unit is replaced entirely, and no one cares about the client’s financial expenses. It is not surprising that the owner of a damaged washing machine strives to repair it on his own, regardless of time or lack of experience.
But L1, which only needs to be rewound, is nothing more than a coil (Fig. 1a) of a multi-pole electromagnet mounted on an axis and which is the rotor of an electric motor. You should also take into account other factors that complicate repairs. In particular, the fact that there is a gear at the end of the rotor. Of course, the ED also has a stator - a unique, stamped one. The electric motor is attached to the command device (Fig. 1b) with three pins that fit into holes in the spacecraft body and are slightly flared on the back side.
Rice. 1. The coil (a) burns out, but the workshop does not repair it, but prefers to replace the entire complex and expensive “monolith” (b) with a new command device with an electric motor included in it:
1 - coil frame; 2 - winding; 3 — output (2 pcs.); 4 - electric motor; 5 — command apparatus body; 6 — axis of the program selection knob; dimensions d, D and H - in accordance with the specific model of the washing machine
When disassembling this unit, it is necessary to ensure that the current-carrying conductors are not disconnected from the terminals. This precaution is dictated not only and not so much by the troublesomeness of restoring accidentally opened contacts, but by the difficulty of finding the disconnected terminals themselves.
Before removing the ED housing, it is advisable to apply control marks on it and on the spacecraft body, which will subsequently allow the entire structure to be correctly assembled with a new L1 wound independently. By inserting a screwdriver into the gap between the disconnected units and lightly pressing it, you can separate the motor from the control device and remove the burnt out winding. But this must be done carefully so as not to lose the overrunning clutch - a small plastic part located between the ED housing and the armature.
Connection rules
When the type of electric motor installed on the old washing machine has been determined, you can begin connecting.
Recommendations
Advice! If you plan to use a powerful modern motor, you should remember the following points: capacitors are not needed for their operation, and a starting winding is also not required.
Before connecting a device with more than 3 terminals to the network, you need to understand the colors of the wires coming out of the transfer case:
- often a white winding means that these wires belong to the tachogenerator; they will not be useful in the future;
- brown and red are connected to the stator winding and rotor;
- The gray and green wires are graphite brushes.
Although this recommendation applies to most models, there are some releases where the colors may vary. To be sure of your choice, you need to ring all pairs using a tester and a multimeter. Those that go to the tachogenerator have a resistance of 60-70 Ohms.
Important! After connecting all the wires of a modern 6-pin engine, you can check the functionality of the device by connecting it to a car battery. When voltage is applied through the starting relay, it will immediately (without acceleration) begin to rotate. If the test has confirmed the effectiveness of the circuit, you can connect the motor to a 220-volt network, having first firmly secured the motor.
Scheme
Old engines have 5 wires - one goes to ground. The rest can be easily divided into pairs by simply ringing them. Now it is important to determine which pair is related to start-up and which is working. Usually the resistance is higher at the starters, and it is they that need to be connected via a capacitor to the “SB” button. To prevent the engine from burning out, the button must be without a lock; for this purpose, you can use a doorbell. Sometimes such motors have three output wires, which means that the two windings were connected at the factory.
Level sensor-relay RU-3SM
The RU-3SM level sensor-relay is used to control the specified level of water filling into the washing machine tank. The level sensor-relay is set to operate at pressure, Pa: 1765 – when the water level rises; 588 – when the water level drops. The operating range is when the level increases from 755 to 2450 Pa, the dead zone is at least 490 Pa. The electrical load on the contacts of the level relay switching device is no more than 16 A at a voltage of no more than 250 V AC, a frequency of 50 Hz and a power factor of no less than 0.8.
All main parts of the level switch are fixed to the housing (Fig. 2). A membrane is placed between housing 2 and the cover, which serves as a sensitive element and divides the level switch into two cavities. One cavity is sealed and is connected through fitting 3 to a controlled water level. The second cavity houses switches. Connected to the membrane is a rigid center with pushers, which, through stops 7, transmit force to the switching flat springs and to the adjustment springs 9. On the opposite side, the springs 9 rest against the adjusting screws 8. Instant transfer of contacts is carried out due to tilting springs.
Rice. 2 Schematic diagram of a level relay.
1 - rivet, 2 - body, 3 - fitting, 4 - membrane, 5 - cover, 6 - center with pushers, 7 - stop, 8 - adjusting screw, 9 - spring
The fixed contacts are attached to the body with 2 rivets 1. Adjustment of the response and dead zone, as well as the gaps between the contacts, is carried out with special screws. Adjustment to required levels
actuation is carried out by changing the compression of the adjustment spring with screws 8.
An additional protective contact is built into the level switch on the switching plates. The cover 5 of the membrane 4 is attached to the body 2 by rolling the edges of the cover onto the shoulder of the body. To eliminate the influence of pulsations of a controlled level on the response, a calibrated hole is made in fitting 3 for air throttling.
The operating principle of a water level switch (also called a pressure switch) is based on converting the pressure created by a column of liquid and acting on a membrane into the movement of movable contacts and switching of the contact devices of the level switch. When the pressure increases and the upper set value of the water level is reached, the membrane switches contacts through pushers. When the pressure decreases by the value of the dead zone, the contacts switch back. Instant transfer of contacts is carried out due to switching flat springs.
Depending on the design, the relay can be configured to several levels. In Fig. Figure 3 shows three states of the so-called two-level relay.
Rice. 3 Schematic diagram of a level relay.
a) both contacts (A and B) are open;
b) level I: contact A is closed, contact B is open;
c) level I: contacts A and B are closed.
When switching currents up to 16 A and voltage 220 V, it is possible to weld the contacts at the time of draining the water. In this case, to prevent the heating element from burning out, an additional contact is built into the level relay, which switches a current of 0.1 A at a voltage of 220 V and closes reliably when water is drained from the tank below a given level point. Through a protective contact, the power circuit of the electric valve is turned on to open the emergency water supply to the washing machine tank,
Reverse" href="/text/category/revers/" rel="bookmark">reversible).
The working cams control the washing machine's electric motor, drain pump, inlet solenoid valve and heating element. Auxiliary cams control changes in the direction of rotation of the drum during washing, as well as special washing and spinning programs (delicate modes).
https://pandia.ru/text/78/040/images/image012_10.gif" width="238″ height="199″>
Rice. 4 Cam-type command device:
1 - cams, 2 - electric motor, 3 - contacts, 4 - program dial, 5 - program selection handle
A group of working (main) cams is driven by an electric motor of the command device. The cams make discrete turns (steps), with a full 360° rotation of the cam typically taking 60 steps. Depending on the design of the control device, the time for a full revolution can be 90, 120 or even 300 minutes.
The operating cam is designed in such a way that the contact controlled by it can be in two or three positions. The two positions correspond to the states “closed” or “open”. The following states correspond to three positions:
Closing the contact between the common input and output A;
Opening the circuit;
Closing the contact between the common input and output B.
The time the contacts remain in one position or another is determined by the profile of the cam. A graph reflecting the state of contacts at each step of program execution is called a cyclogram of the command device (Fig. 5).
To perform some special operations, the command device can be equipped with a system for stopping the advancement of the cams. This blockage may remain until the washing machine performs certain functions. The washing program continues after these functions have been completed.
For example, the “Thermostop” device is used to prevent the movement of the cams of the control device until the water in the tank reaches the desired temperature. It blocks the working cams in relation to the main axis of the command device, leaving only the auxiliary cams in operation.
https://pandia.ru/text/78/040/images/image014_2.jpg" width="292″ height="300″>
Rice. 5 States of contacts at various steps of program execution (cyclogram of the command device)
Another locking operation, “Hydro Stop” (sometimes also called “Post Rinse Stop” or “Before Spin Stop”), consists of stopping the machine with laundry and a partially filled tub after a gentle rinse when washing delicate fabrics. To do this, the power supply to the electric motor of the control device is interrupted. The machine's operation is suspended until the user manually moves the control unit one step.
The main switch of the machine can also be built into the command apparatus; in this case, it can be turned on and off using the program selection handle, moving it along the axis of the command device (pushing it towards you or retracting it). The main contacts L and N of the washing machine power circuit are affected by a disk combined with a handle (Fig. 6).
Rice. 6 Closing the contacts of the main switch of the washing machine when the program selection handle is pulled out
Possible connection problems and their elimination
If all the wires are connected correctly, but the washing machine motor turns off after a few minutes of starting, overheating may be the cause. To identify a heating part, you need to run the engine for one minute. During this time, only the problem area will have time to heat up. This way you can understand that the bearing assembly, stator or other part has failed. In this case, it is not necessary to change the bearings; perhaps they are simply clogged, or there is not enough lubrication. If the cause of the motor shutdown is the capacitor, then it should be replaced with a device with a lower capacity.
When all parts have been replaced, you need to run the engine for 5 minutes and check its heating. Then the procedure should be repeated two more times, and only after this can you be sure that the electric motor is working.
Important! Sometimes an induction motor can run too slowly. One of the reasons is a short or break in the winding. In any case, such a motor is not suitable for further use.
Having understood the intricacies of connecting the motor from an old washing machine, you can make your life easier and save your budget by making several universal tools. If all faults in the engine are corrected in a timely manner, it will last for several more years. The main thing is to follow safety precautions when working with electricity.
How to connect the motor from an automatic washing machine
Where can I connect the motor from an automatic machine? There are a huge number of options, and the most important thing is that if there is data on the operation of such products and the rules of connection, then it is quite possible to assemble new devices that can be useful in the household. You should not throw away washing machines until they are completely disassembled, as there may be a huge amount of useful accessories inside. For example, if an Indesit machine breaks down, you can get a 430 W engine capable of reaching speeds of up to 11,500 rpm. Naturally, it can only be used if the part is in full working order and will not cause a breakdown of the new equipment. There are an incredible number of ideas on how to use the engine of an old machine, and even a small washing machine has its own engine that can be useful.
Options:
- The simplest option is to make a sharpening machine, which will allow you to sharpen objects such as scissors, knives and similar sharp-cutting objects. Such an emery machine is turned on only after the motor is carefully secured to the surface of a solid base, as well as the shaft is installed on a grindstone or grinding wheel. After assembly, you can connect the equipment to the network.
- If, for example, a private house is being built or the surrounding area is being poured with concrete, a concrete mixer may be required. It is for this that an electric motor can be used. It is not difficult to convert a washing machine into a concrete mixer, and to do this you also need to disconnect the tank from the washing equipment.
- Vibrating tables using such a motor will allow you to produce cinder blocks, the cost of which is far from small, and you can save a lot of money with your own hands.
- Is there a lot of grass in the area? Do you have rabbits that need grass? Do you mow hay regularly? If you use the motor correctly, it can become an excellent substitute for a trimmer and will allow you to remove grass quickly, simply and without spending a lot of money on it. This device is considered simply necessary for those who live outside the city and especially for those who like to engage in agriculture.
This is just a minimal list of what can be done if you use a part from a washing machine in the form of an electric motor. You may need various attachments, additional containers, or even auxiliary parts, but if you have an idea, you can create new equipment quickly and without investment.
How to buy?
To buy the product you like, simply click the buy button and in the window that appears, click on the inscription “place an order”. After that, fill out the fields that appear. That's it, the order is placed, and you should receive an order number by email. The manager will contact you shortly.
Or you can always consult and place an order by multi-channel phone.
You can purchase the product with delivery or pickup. You can see the address of the pickup point and the delivery price here.
| Weight, kg | 14.2 kg |
| Volume | 0.1037 m³ |
| Manufacturer | Russia |
The connection diagram for the motor of the Vyatka type of machine is one of the main parts of the programmer, which must be taken into account during repairs. The electric motor itself consists of two reverse coils, which create the direction of the torsion shaft.
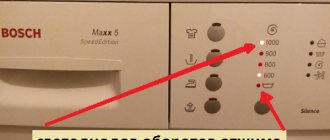
The engines installed in Vyatka are different, but their technical parameters are not much different. The reverse speed is 2200 rpm, and the spin speed is 450 rpm. The terminals on the motors are five or six pin.
However, the connection diagram of the engine to the Vyatka automatic machine device is the same in both cases. Let's look at it:
If connected correctly, the motor starts well in both directions. The only thing that needs to be taken into account in this case is that reversing the direction of rotation is performed only when the shaft is completely stopped, since the winding is not capable of withstanding large currents. It should also be taken into account that the thermal contact must be turned off when the unit is operating in the cold. Since they tend to burst due to temperature changes, this also applies to overheating.
Washing machine motor connection diagram
In order for the conversion of a washing machine into new equipment using such a part as an electric motor to be of high quality and bring results, you need to pay attention to the advice of experts on how the connection diagram will be carried out. You can even remove the engine from a Soviet washing machine called Vyatka, the main thing is that it is working.
The engine connection feature is carried out:
- By using a component such as a capacitor, which must be connected as correctly as possible;
- With no starting winding.
Before making the connection, it is advisable to sort the wires by color. This grouping will allow you to connect without errors.
There are 3 types of wires on the transfer case:
- The white two wires are the connection of the tachogenerator, which are not needed.
- The brown and red wires go to the stator and rotor windings.
- Gray and green are needed to connect to graphite brushes.
Depending on the engine model, for example, on the Sibir washing machine produced in the USSR or Indesit, the wires themselves and their number may differ, but the connection must be extremely accurate. To detect broken wires, just test them with a multimeter. The one that goes to the tachogenerator has a resistance of 60-70 ohms. These cables are insulated and routed to the side.
How much does the repair cost?
The final cost of repair depends on the type of damage. It will become known after diagnosis by a specialist. Now you can roughly estimate the upcoming costs using the price list below. For your convenience, prices are presented in two ways - in the form of names of work and depending on the symptoms of the breakdown.
| Symptoms of a problem | Repair time | Price ** |
| Expert visit and diagnostics* | 5-10 minutes | 0 rub.* |
| Doesn't drain | from 20 minutes | from 1000 rub. |
| Doesn't heat up | 30-60 minutes | from 1800 rub. |
| The lights are on | from 20 minutes | from 1300 rub. |
| Won't start washing | from 20 minutes | from 1400 rub |
| The drum does not rotate | from 40 minutes | from 1100 rub. |
| No water fill | from 30 minutes | from 1200 rub |
| It rattles and creaks | from 40 minutes | from 1500 rub. |
| Vibrates strongly | from 40 minutes | from 1600 rub. |
| Knocks out plugs when washing or turning on | 30-60 minutes | from 1800 rub. |
| Water flows | from 30 minutes | from 1200 rub. |
| No spin | from 40 minutes | from 1100 rub. |
| Doesn't open after washing | from 30 minutes | from 1700 rub. |
| The hatch door does not close | from 30 minutes | from 1700 rub. |
| Doesn't rinse clothes | from 30 minutes | from 1900 rub. |
| Name of works | Repair time | Price ** |
| Specialist visit and diagnostics* | 5-10 minutes | 0 rub.* |
| Replacing a button on the control panel | 30 - 50 minutes | from 1400 rub. |
| Hatch handle - replacement | 30 - 50 minutes | from 1600 rub. |
| Replacing the water level sensor | 30 - 60 minutes | from 1700 rub. |
| Pressostat repair | 15 – 40 minutes | from 1100 rub. |
| Replacing the water supply valve | 30 - 50 minutes | from 1600 rub. |
| Drive belt - replacement | 15 – 40 minutes | from 1100 rub. |
| Replacing the drain hose | 30 - 50 minutes | from 1400 rub. |
| Replacing the pump | 40 – 70 minutes | from 1900 rub. |
| Replacing the heating element | 30 - 60 minutes | from 1800 rub. |
| Removing foreign objects from the tank | 30 – 80 minutes | from 1500 rub. |
| Replacing the hatch locking device | 30 - 60 minutes | from 1700 rub. |
| Replacing motor brushes | 30 – 80 minutes | from 1400 rub. |
| Replacing the cuff | 40 – 80 minutes | from 1900 rub. |
| Bearing replacement | 60 – 180 minutes | from 3000 rub. |
| Replacing the control board | 30 – 70 minutes | from 2200 rub. |
| Control module repair | 40 – 80 minutes | from 2300 rub. |
| Electric motor replacement | 40 – 80 minutes | from 2300 rub. |
| Replacing shock absorbers | 40 – 80 minutes | from 1600 rub. |
| Tank replacement | 60 – 180 minutes | from 3700 rub. |
| Replacing the temperature sensor | 30 - 60 minutes | from 1200 rub. |
* In case of refusal of repair, you must pay 400 rubles. for a technician’s visit and diagnostics
** The price includes ONLY WORK on repair or replacement of parts, spare parts are paid separately
Motor from a washing machine: connection to 220
The washing machine motor is a device that has: certain characteristics, excellent power, four outputs for switching on, the ability to operate only from the network, high rotation speeds depending on the model, and a power regulator. The electrical circuit requires connecting the stator winding to the rotor brush.
To do this, a jumper and insulation are formed using a special tape.
Next, there are wires from the rotor winding and the second brush. They must be connected to the home voltage. If you connect the motor to a 220-volt network, rotation will begin automatically, which can lead to injury, and this can be prevented by mounting it on any surface. It is possible to change the direction of rotation, for which the jumper is transferred to another group of contacts.
MANUAL
GENERAL INSTRUCTIONS
1.1. Automatic household washing machine type SMA-4FB model “Vyatka-automatic-16”, hereinafter referred to as “machine”, designed for washing, rinsing and spinning laundry from all types of fabrics using low-foaming synthetic detergents.
1.2. The machine performs bluing, starching, bleaching, aromatization and antistatic treatment of linen, hereinafter referred to as “special treatments”, by introducing the appropriate agents into the dispenser.
1.3. The machine operates from a hot and cold water supply network, hereinafter referred to as “mixed water supply”, or only from a cold water supply network with full or partial heating of the washing solution.
1.4. The machine is intended for operation only during the daytime (from 7 a.m. to 11 p.m.).
1.5. The main advantage of the machine is the complete automation of washing modes, including preliminary and main washes, rinsing, special treatment and spinning.
1.6. To save water, electricity and detergent consumption, economical and energy-saving washing modes are provided.
1.7. The machine must be connected to a 220V electrical network using a two-pole plug with a grounding contact.
1.8. Machine models differ in design.
Symbol of the machine.
To reduce the consumption of electricity, water and detergents in the machine, an “economical tank” in Fig. Figure 2 shows the levels of water filled in a regular tank and an “economical” one. When using an “economical” tank in a machine, the indicators “WASHABILITY, RINSEABILITY, LOSS OF STRENGTH” comply with the requirements of the State standard.
An example of the designation of a machine of the “Vyatka-automatic-16” model, operating from a hot and cold water supply network, having a drum rotation speed during spinning of 500 rpm and an enameled tank: “Vyatka-automatic-16” BA160500
1.9. The general view of the machine is shown in Fig. 1
Machine with conventional pump filter
Machine with front bottom panel
Rice. 1 General view of the machine.
Rice. 2 Water filling level in tanks of various designs
TECHNICAL DATA
Attention to buyers!
ATTENTION!
To ensure electrical safety, the machine must be grounded!
Refinement of the electrical and water supply networks, if necessary, should be carried out by a specialized organization, the address of which you can find out in the store.
All movements and transportation should be carried out with the tank secured (Appendix 2). In case of non-compliance with the requirements for fastening and packaging of the machine, claims regarding the operation of the machine will NOT be accepted by the manufacturer.
If the machine is brought from the street into a heated room in winter, then before turning it on, it must be allowed to warm up to room temperature for 2 hours.
The design of the machine is constantly being improved, so there may be some discrepancies between the design of the machine and the operating instructions, which do not affect the technical data.
CONTENTS OF DELIVERY.
Table 2.
| Name | Quantity |
| Washing machine | 1 PC |
| Water filling hoses | 2 pieces (1 piece) |
| Gaskets | 4 pieces (1 piece) |
| Bracket for securing the drain hose in working position | 1 PC |
| Screws for attaching the bracket body to the machine body | 2 pcs |
| Inserts | 3 pcs |
| Tray for draining residual liquid | 1 PC |
| Double-pole socket with grounding contact | 1 PC |
| Plastic bag | 1 PC |
| Manual | 1 copy |
| Package | 1 set |
| Device for connecting to the water supply network | 1 set |
Note.
The data in parentheses is for machine models operating only from a cold water supply network.
SAFETY REQUIREMENTS.
Safety during operation of the machine is ensured by the design of the machine, correct connection to the electrical network and proper grounding, as well as your correct actions.
Monitoring the correct connection of the machine to the electrical network and proper grounding is carried out by specialized organizations, the address of which you can find in the store.
PREPARATION FOR WORK.
5.1. Installation work.
5.1.1. The machine is connected to the electrical network using a two-pole plug with a grounding contact (Fig. 4). If your apartment does not have a two-pole socket with a grounding contact, it must be installed. The socket is included with the machine.
If the electrical wiring in the apartment where the machine is installed has an aluminum wire cross-section of 2.5 sq. mm (copper 1.5 sq. mm), then when installing an outlet it is allowed to use this wiring with a grounding wire of the same cross-section.
5.1.2. If necessary, in addition to modifying the electrical wiring (laying a grounding wire), install a new protective device and an apartment electric meter for a current of at least 15 A on the floor panel.
5.1.4. Refinement of the intra-apartment electrical and water supply network at the request of citizens who bought cars should be carried out by specialized organizations in accordance with the recommendations of this manual and in accordance with the “Temporary rules for the installation and connection of electrical household machines and appliances with a power of 1.3 to 4 kW in public housing and housing cooperative buildings."
You can obtain the address of a specialized organization for machine maintenance and repair in the store.
5.2. Machine installation.
ATTENTION! Due to the fact that the machine is a complex product, improper installation of the ACS may result in an accident or accident. Installation and testing of the operation of the machine is carried out only by specialists from companies that provide warranty service for household appliances.
5.2.1. Remove packaging.
5.2.2. Open the hatch by moving the stopper with the sign on the hatch handle to the left, i.e. to the center of the hatch, and pull the lever towards you (Fig. 1).
Remove components and documentation from the machine tank. Close the hatch smoothly (until it clicks).
5.2.3. Remove the parts securing the tank when transporting the machine. In this case, it is recommended to follow the following sequence (Fig. 3): unscrew the screws 7 securing the rear panel 8, remove the panel, unscrew the nuts 11, remove the bushings 14 located on the screws 15 between the housing wall and the tank and screws 15.
Unscrew the screws 5 and remove the rod 3 together with the bracket 4, install the rear panel 8 in its original position, securing it with screws 7.
The procedure for bringing the machine into transport position is given in Appendix 2.
5.2.4. After dismantling the parts, the tank should hang on the springs, which is its working position.
5.2.5. Plug the holes in the housing for transport elements (bolts, rod) with plastic inserts included in the machine kit.
5.2.6. Secure the drain hose to the rear wall of the machine body (Fig. 4) with the supplied bracket and screws so that the cleaning solution does not spill out if the hose falls.
5.2.7. Connect the inlet hose connected to the solenoid valve fitting marked " X"
» (on the back of the machine), to the cold water supply.
If you have a hot water supply network, connect the second inlet hose to it, and the other end of the hose to the solenoid valve fitting marked “ G
” (Fig. 4). In this case, rubber gaskets supplied with the machine must be installed in the connecting nuts of the inlet hoses.
5.2.8. Install the machine at a distance from the bathtub or sink so that you can use the drain and inlet hoses. The machine body must not touch any nearby equipment.
5.2.9. Adjust the stable position of the machine by rotating the legs (Fig. 3) and secure it by screwing the nuts to the machine body.
5.3. Preparing laundry for washing.
5.3.1. Check your laundry before washing. Remove foreign metal objects from your pockets, as... they can tear your laundry and cause your machine to break down. Failure to comply with this paragraph constitutes a violation of the Operation Manual.
5.3.2. Sort the laundry by type of fabric (cotton, linen, synthetic, etc.), by color (white and colored).
5.3.3. Repair your linen: mend tears, sew on loose buttons, close zippers, hem hems.
5.3.4. Unfold large items of clothing before washing.
5.3.5. The dry weight of loaded laundry should not exceed the values specified in the technical data.
Table 3.
| Name | Weight, g | Name | Weight, g |
| Sheet | 425 | Children's shirt | 200 |
| Pillowcase | 200 | Women's shirt | 150 |
| Kitchen towel | 200 | Skirt | 300 |
| Bath towel | 350 | Handkerchief | 25 |
| Duvet cover | 625 | Stockings, socks | 60 |
| Tablecloth | 600 | Cotton trousers | 800 |
| Men's outer shirt | 300 | Flannelette blanket | 1300 |
| Ski suit | 1500 |
5.4. Preparing the machine for work
5.4.1. Lower the end of the drain hose into the sink or bathtub (Fig. 4) so that the end of the hose is at a height of 0.8-1.0 m from the floor level.
5.4.2. Connect the machine to the electrical network.
5.4.3. Open the water valves to which the inlet hoses are connected.
5.4.4. Load a load of laundry into the machine drum and close the hatch. To avoid increased vibration of the machine during the “spin” program, it is not recommended to load less than 1.5 kg of laundry.
Rice. 5 Dosing hopper
5.4.6. When washing in a machine, it is necessary to use washing powders with low foaming.
5.4.7. A product for special treatment of laundry is introduced into the bath before washing in a solution prepared according to the recipe specified in the rules for its use. The volume of solution should not exceed the level indicated on the cap.
To avoid spontaneous draining of the solution from the bath, it is not recommended to sharply push the hopper when installing it.
Using the economical washing mode, the amount of washing powder can be reduced by about 1/3.
If it is necessary to use bleaching agents, they can be added to the central bath along with washing powder.
Before adding detergent into the dispenser hopper, make sure that the tubs are dry.
When washing lightly soiled fabrics and/or in soft water, we recommend reducing the amount of washing powder.
6. PURPOSE OF CONTROLS AND INDICATORS
On the control panel (see Fig. 6) there are:
OPERATING PROCEDURE.
7.1. Selecting a washing program.
The program selection is carried out in the off (pressed) position of the control device handle. Dial the required washing program by turning the control knob clockwise, aligning the number of the program you need with the pointer (Fig. 6)
The list of programs, type of laundry and operations performed by the machine are given in table. 4
Table 4 List of programs.
| Type of linen | Inscription on the panel | Position of the control device handle | Weight of loaded laundry, kg | Loop in progress | |
| Durable fabrics (cotton, linen) with heavy soiling | 1 heavy contamination | 1 | 4 | 2,5 | Pre-wash at T=40C, wash at T=90C, 5 rinses, spin |
| Durable fabrics (cotton, linen) with medium soiling | 2 medium pollution | 2 | 4 | 2,5 | Pre-wash at T=40C, wash at T=90C, 5 rinses, spin |
| Durable fabrics with normal soiling | 3 normal contamination | 3 | 4 | 2,5 | Wash at T=90C, 5 rinses, spin |
| Durable, low-stain fabrics | 4 low pollution | 4 | 4 | 2,5 | Wash at T=60C, 5 rinses, spin |
| Durable, non-fading fabrics with average soiling, resistant at T=60C | 5 colored fabrics 60C | 5 *** | 4 | 2,5 | Wash at T=60C, 5 rinses, spin |
| Durable, fade-resistant fabrics with medium soiling | 6 colored fabrics 40C | 6 | 4 | 2,5 | Wash at T=40C, 5 rinses, spin |
| Durable fabrics that can be rinsed | 7 rinse | 7 | 5 rinses, spin | ||
| Durable fabrics that must be subjected to special treatments | 8 special processing | 8 | 2 rinses, spin | ||
| Durable, spin-resistant fabrics | 9 spin | 9 | Spin | ||
| Delicate non-fading fabrics (synthetic silk) with heavy soiling, resistant at T=60C | 10 bio delicate wash | 10 | 2,5 | 1,5 | Pre-wash at T=40C, wash at T=60C, 3 rinses, hydrostop |
| Delicate non-fading fabrics with average soiling, resistant at T=60C | 11 mixed fabrics | 11 | 2,5 | 1,5 | Pre-wash at T=20-30C, wash at T=60C, 3 rinses, hydrostop |
| Delicate non-fading fabrics with light soiling, resistant at T=60C | 12 synthetic 60C | 12 | 2,5 | 1,5 | Wash at T=60C, 3 rinses, hydrostop |
| Synthetic fabrics with light soiling, resistant at T=40C | 13 synthetic 40C | 13 | 2,5 | 1,5 | Wash at T=40C, 3 rinses, hydrostop |
| Pure wool fabrics | 14 wool | 14 | 1,5 | Wash at T=40C, 3 rinses, hydrostop | |
| Delicate fabrics | 15 rinse | 15 | 3 rinses, hydrostop | ||
| 16 plums | 16 | Drain | |||
***Note. For car models with an “economical” tank, the “E” key must be turned on. If the “E” key is not turned on, the washing temperature is not standardized.
Turn on the machine by pulling the control lever towards you until it clicks. At the same time, the indicator lights up and water is poured through the corresponding dispenser tray.
7.2. For pre-washing and rinsing, only cold water is poured in both cold and mixed water supply. For the main wash with mixed water supply, hot and cold water are poured in simultaneously. When connecting the machine to a water supply network with only cold water, the operating procedure of the machine does not change, only the washing time increases by increasing the duration of heating the washing solution to a temperature of 40C.
7.3. During the preliminary and main washes, after adding water and stirring the laundry in the drum, the electric heater is turned on. At this time, it is possible to stop the rotation of the drum, and when the washing solution reaches a temperature of 40C, the drum begins to rotate.
7.4. In the washing and rinsing modes, the drum rotates alternately in both directions with different intervals between rotations depending on the mode (intensive or soft). The drum rotation mode is selected automatically by the command device.
7.5. At the end of the work cycle, the machine stops and turns off automatically.
The machine can be turned on again if you want to resume the cycle from the point at which it was interrupted, and also repeat any of the operations, while the program dial must be placed in the desired position.
7.6. During operation, the program disk rotates clockwise from the program you have selected until the position where the “” number on the disk aligns with the pointer.
7.7. When washing delicate fabrics (silk, synthetics, wool), the machine stops and turns off automatically without draining the water from the tank (the so-called “ Hydrostop”
"), which is necessary to prevent the formation of wrinkles in the fabric.
To drain the water, set the control knob to the “ Drain
” position, after which immediately unload the laundry.
7.8. Turning off the machine.
After finishing the wash, turn off the machine by pressing the control knob, unplug the cord from the socket and close the taps (valves).
MAINTENANCE.
8.1. After finishing washing, wipe the body and rubber parts of the machine with a soft, damp cloth. Do not wipe machine parts with gasoline or other solvents.
To dry the car, leave the hatch slightly open.
8.2. At the end of the wash, remove the hopper from the dispenser by pulling it towards you, rinse under running water and wipe dry. Install the hopper into the dispenser by pushing it all the way.
8.3. To ensure normal operation of the pump, it is necessary to periodically wash the pump filter, for which place a tray under the filter to drain the remaining liquid and then unscrew its cover 2-3 turns and pull the filter towards you (Fig. 7). In this case, it is possible to drain the remaining water from the hydraulic system. Clean the filter holes and rinse it under running water. After washing, replace the filter and screw on the lid.
Installation is in the reverse order.
STORAGE RULES
9.1. The machine should be stored in rooms with an ambient temperature of at least 5C.
9.2. Protect the car from sudden shocks and impacts.
9.3. Compliance with these requirements and careful handling of the machine will extend its service life.
10. POSSIBLE MALFUNCTIONS AND METHODS OF THEIR ELIMINATION
10.1. The list of the most common faults and methods for the simplest and fastest elimination of these faults by the consumer are given in table. 5
Types of motors for a washing machine
For a part such as a starting motor, which requires an electrical network or simply current to operate, application can even be found in equipment such as a car pump.
To do this, you can use motors from various washing machines, for example:
- Donbass;
- Riga;
- Oka;
- Nuova;
- Ibmei.
Regardless of what year of production, the engine can last a long time if installed correctly. There are many ways you can reduce or increase the rotation speed or understand why the relay is not working, but in order to include the device in new equipment, you need to not only look at the recommendations, but also carefully monitor each stage of the work.
Suitable engines:
- DAOTs U4 with brushes, DAOA;
- RTK 1uhl4, uhl4, 1u4;
- HXGP1l, 3у4, 3ухл4, 9ухл4.
The use of a commutator motor is especially common, since its stator contains a permanent magnet that can be alternately connected to a current with a constant voltage. This is a kind of reverse that allows you to consume energy in small quantities and save your budget. Electronic engines, which have an electronic control unit on the body, are no less in demand.
Modern engines have a special speed controller, which is required to control the rotation speed.
Why is such a detail needed? If the engine is connected to a concrete mixer or a vibrating machine, it will be necessary to reduce the rotation speed and accordingly direct it to reduce the activity of the operation. Excessive vibration allows the desired process to be carried out more efficiently.
To connect the engine regulator from the car in which it was installed, you need to do the following. It is removed from the cavity of the old washing machine along with the radiator, which is a semiconductor device, due to which the on and off control is carried out. Next, it is soldered into the relay chip, replacing the low-power part. If you do not have the skills to work with such processes, then it is better to entrust it to a real professional, for example, a computer engineer. Especially if the colored tape pulls and gets hot.
How to start the engine from a washing machine
It is already known how to give life to a new engine and how long it will take to start a two-speed unit, but how to start and control it if there are some problems? It is also quite possible that the engine simply will not start, even if you managed to connect everything correctly. In this case, you need to check the heating of the engine after it starts working. A couple of minutes is enough, and if during this time the heat does not spread to all parts, then you need to determine the location of the heat accumulation. This may be in the stator, assembly or bearing area.
The main reason that the part heats up quickly is:
- Presence of wear or clogging of the bearing;
- A strong increase in capacitor capacity, which only an asynchronous motor can have.
After this, the check is carried out every 5 minutes and three times is enough. If the bearing is to blame, then it needs to be disassembled, lubricated or replaced, since there are times when it cannot be restored. It is strictly forbidden to allow the propulsion system to overheat, as this can cause damage to all new equipment and incur expense.
The device of the emery and its purpose
Emery is a useful thing in the household. They are very convenient for sharpening metal knives, scissors, drills, shovels and other tools. You can buy a similar device in stores; there is a wide selection. However, the price may force you to refuse such an acquisition. Therefore, you can try to make emery with your own hands from the engine of an old washing machine.
To carry out such work, you need to have a good understanding of how emery works and what parts it consists of. The simplest version of emery has:
- engine;
- bushing;
- flange;
- starting device;
- emery wheel;
- protective casing;
- electrical cable and plug;
- support.
Of all the parts listed, you will need to purchase a high-quality sanding wheel. All other details can be made with your own hands, this will be discussed further.
Grinding the flange
To fit the emery wheel onto the motor bushing of a washing machine, you will need a flange, since the diameter of the shaft usually does not coincide with the diameter of the stone. If there is no factory flange suitable in diameter, then we make it ourselves. We take a piece of metal pipe, the diameter of which is such that the pipe is easily and firmly pressed onto the motor shaft; usually a pipe with a diameter of 32 mm is suitable. The length of the steel pipe should not exceed 150-200 mm; this will be enough to attach an emery wheel to it.
So, at one end of the pipe, using a tap, we make a thread approximately twice the thickness of the circle. After this, the second end of the pipe must be heated well, for example with a blowtorch, and put on the shaft. You can secure a flange made by yourself by welding, if possible, or with a bolt, drilling through the flange and the shaft for this purpose.
Important! The thread on the flange must be opposite to the rotation of the motor shaft from the washing machine, so that the emery disc does not fly off during rotation. If the thread was cut incorrectly, then on an asynchronous motor the shaft rotation will have to be changed.
The transition part from the engine to the emery wheel is ready, now we screw the nut onto the thread, then the washer. After the washer, we put on a grinding wheel, which we secure with a washer and nut. Tighten the nuts well; for strength, you can screw another lock nut at the end.
Connecting the engine
For self-assembly of emery, craftsmen recommend taking motors from Soviet-era washing machines such as Volga, Oka or Vyatka. This is explained by the fact that the engines on them are powerful. In general, a motor with a power of about 200 W, at 1000-1500 rpm, is sufficient, although a 400 W motor at 3000 rpm can also be used to make household sandpaper with your own hands. But at the same time, the emery stone must be very strong, otherwise it will collapse at such speeds.
A very important step in making emery is connecting the motor to the electrical network. To do this you will need an electrical wire and plug. Connecting the motor from an automatic washing machine and the motor from a Soviet washing machine is slightly different. In a six-wire automatic machine engine, only 2 wires going to the motor brushes and 2 wires from the stator are required. The remaining 2 wires are the tachometer wires.
To find these wires, you need to take a multimeter. Measuring the resistance of the wires, we find the tachometer wires, their resistance is about 70 Ohms and remove them to the side. The resistance of the remaining wires is determined in pairs. Now we connect one stator wire to the wire from the brushes, insulating the connection with electrical tape. We connect the remaining two wires to an electrical wire with a plug at the end.
Important! Such a motor does not require any capacitor; it will begin to rotate immediately after being plugged into the outlet.
To connect the motor from a Soviet washing machine, you need to determine from 4 wires which are working and which are starting:
- We take a multimeter and apply the probe to one wire, alternately apply the second probe to the remaining wires, as soon as a pair is found, we remove the wires to the side.
- Then we measure the resistance of the second pair of wires.
- We select the working winding, in this case it is the pair of wires whose resistance turned out to be lower.
- Now we connect the wires of the working winding directly to the electrical wire with a plug. You can leave it like that, but then to start the engine, you need to spin the emery circle with your hand and it will start to rotate. You can use a call button as a trigger. How to connect it to the circuit with your own hands? You need to connect one wire of the button to the working winding through the terminal, and the second to the starting winding. The diagram on the right shows how to connect a homemade emery from the engine through a button, where SB is the button, OB is the working winding, and PO is the starting winding.
For your information! A capacitor should not be used as a starting device; it will cause the winding to burn out.
Be careful when working with electrical equipment yourself. If you doubt your capabilities, contact someone who is familiar with a multimeter and understands how to connect a homemade emery machine to the network correctly. You can also find video instructions for connecting the engine on the Internet or watch this video.
Electric motor for a grinder or emery
Purchasing a ready-made sharpening machine is not always possible, primarily due to the high price, and in this case an electric motor from a washing machine or other equipment literally becomes indispensable.
A lot of effort requires the correct layout of the future unit, as well as solving such a technical problem as attaching a grindstone to the motor shaft. In many cases, there is no thread on it, and the diameters of the shaft and the hole in the stone do not match. The usual way out is to use a special part, which must be ordered separately from a turner's workshop. This part may be called a flange, adapter, hub, etc.
The flange to be machined must be fitted onto the shaft and secured with a bolt. In addition, you will need a washer and a nut with threads directed in the direction opposite to the rotation of the motor shaft. Due to this, spontaneous tightening of the nut will occur during operation. Otherwise, the nut will quickly unwind and the stone will fly off.
If necessary, you can change the direction of rotation of the rotor. Asynchronous motors are installed in washing machines, therefore, it is enough to switch the corresponding windings, and the direction of rotation will change. To start the engine you will need a starter coil. If it is missing, then there is nothing to worry about: when you push the stone in the right direction, the device will work on its own.
To make a sharpening machine, it is not at all necessary to use high-power engines. 400 W is quite enough, and even 100-200 W. You should pay attention to the number of revolutions per minute, which should not exceed 3000. Otherwise, a motor with too high a rotation speed may lead to destruction of the grindstone. The best option is an electric motor with 1000 rpm.
Operating a homemade sharpening machine requires strict adherence to safety regulations. First of all, it is necessary to provide a protective casing to protect the worker from abrasive dust and small debris. For this purpose, metal 2.0-2.5 mm thick in the form of a strip folded into a half ring is suitable. In addition, it will be necessary to make a tool rest to ensure the support of the workpieces.
Making the installation
The final stage of making emery is to secure it on a flat surface, such as a workbench or carpenter's table. You can screw the sandpaper to an old, stable stool. On the motor housing of the washing machine there are fasteners with holes. Just before screwing it onto the surface of a table or stool, they place a metal sheet, which also needs to be secured.
For safety reasons, you can attach a metal arc over the sanding disc, which will protect against particles flying during work. In addition, be sure to wear safety glasses when working with sandpaper.
Thus, it is not difficult to make emery from a washing machine motor with your own hands, be patient, read the tips carefully, and watch the video. In addition to emery, you can use the engine and other parts of the machine to make a homemade wind generator, concrete mixer and other useful household items. This is described in the article What to make from an old washing machine.
Disassembly, inspection and repair of the command apparatus
When disassembling the device, special attention should be paid to disconnecting the conductors from the terminals. This precaution is indicated in the instructions and is dictated by the problem of finding disconnected terminals.
Before disconnecting the Vyatka engine housing from the machine’s connection diagram, you need to put marks on it, which will ultimately make it possible to correctly assemble the device.
The coil itself is wrapped in a thin layer of wire. Manufacturing exactly the same part does not make sense, since it is the thinness of the wire that causes the fire. The new part is wrapped with PETV2 wire. According to the instructions, the terminals themselves must be durable. For these purposes, MGSHV and its analogues are used. If you don't do this, the ends of the wire may break under the influence of strong vibrations during spinning. That is why you should also not leave long loose ends of the conductors.
Repairing the control unit of a washing machine with your own hands is quite a difficult job, which requires the user to have certain skills and abilities. However, with a strong desire, even a beginner can cope with it. To do this, you must carefully study the operating instructions for the unit and the recommendations outlined above.
Source