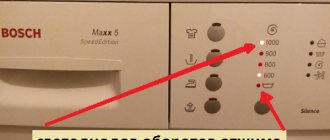
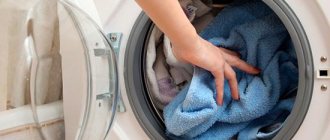
Kandy washing machines are in demand, as the manufacturer offers an optimal balance of price and quality. However, any household appliance fails during active use.
Knowing which parts break most often and what signs indicate this, you will be able to overcome trouble that occurs at the most inopportune moment.
Read the article to get your Kandy washing machine repaired quickly and profitably.
What parts of the Candy washing machine break most often?
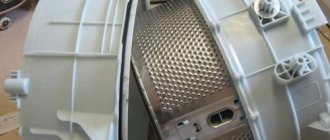
The Kandy washing machine has a complex structure; it consists of many parts. Most often, the main components that bear the main load fail . We are talking about a belt, a crosspiece, an electric heater, a hatch handle and more.
heating element
The heating element is the heating element of the washing machine. It comes into operation every time there is a wash in warm or hot water. The part is located under the drum.
Causes of failure and ways to eliminate them:
Voltage fluctuations in the network that lead to failure in electronics. You can deal with the problem by rebooting the device.- Hard water, which causes salt deposits on the electric heater. If the part is not burnt out, you can try to descale it and put it back in place.
- Oxides on contacts. They need to be cleaned.
- Damage associated with active and prolonged use of the machine. In this case, the heating element will have to be replaced.
Error codes indicating a breakdown of the heating element are 5, E5, E05, Err5, Error 5, or the same letters, but with the number 14, 16 or 22. Read more here.
Control board
The control board is the intelligence of the Kandy washing machine; it is responsible for executing all programs. The part is represented by a microcircuit, which is located in the upper part of the case .
The control board is susceptible to moisture and voltage surges. These reasons most often lead to the fact that either individual elements and tracks burn out, or a failure occurs in the firmware.
There are various signs indicating a board failure. The machine may not turn on at all, or will not execute one or more programs, jump from mode to mode, etc. Error codes – 14, E14, Err14, Error 14, or any other errors associated with performing a certain action.
The repair comes down to diagnosing the board, replacing burnt-out capacitors or triacs , and soldering the tracks. Sometimes flashing the memory and reprogramming the device is required. If the damage is serious, the board is replaced.
Water level sensor
A pressure switch is necessary so that the device can assess the degree of filling of the drum with water and perform further actions. If it breaks, the machine does not start the wash, the tank overflows or remains half empty.
Reasons for failure of the pressure switch:
- voltage surges leading to burning of wires;
- blockages in the pressure pipe;
- natural wear and tear.
To deal with the breakdown, you need to remove the part and check it for blockages. You should also eliminate minor damage, clean the contacts, and restart the machine. If these measures are ineffective, the pressure switch must be replaced.
Error code indicating a breakdown of the water level sensor is 2, E2, Err02, Error 2 or 20, E20, Err20, Error 20.
Cross
The cross is responsible for rotating the drum during washing . The part is subject to enormous loads, so over time it can break or bend.
A malfunction of the crosspiece is indicated by extraneous sounds that appear during washing and spinning. It may be rustling, knocking, grinding.
The only option to repair a broken or bent part is to replace it. There is no separate error code for a broken crosspiece. It is the same as the one that indicates bearing wear - 7, E7, E07, Err7, Error 7.
Causes of crosspiece failure:
- malfunction of the device,
- drum overload,
- bearing wear,
- hard water.
Belt
Without a belt, it is impossible to rotate the drum, since it is the belt that transmits the energy of the engine. If the belt falls off or breaks, a hum will be heard and the appliance will continue washing or spinning. However, the drum will remain in place.
Causes of failure and ways to eliminate them:
- The belt has stretched due to constant overload. It needs to be replaced.
- The belt falls off due to wear of the oil seal and bearings, or due to a burst crosspiece. There is no need to change it, you need to fix the main damage.
- The belt broke due to improper use of the device. Repair is not possible, replacement is required.
There are no error codes for belt breaks. A message may appear indicating that the bearings or motor are damaged. To diagnose the problem, just unscrew the case.
Hatch handle
The hatch handle serves for its safe and convenient opening. It is made of durable plastic, which is difficult to break. However, with the application of force, this is possible.
If a part is broken, it cannot be repaired . You'll have to buy a new pen. To perform the replacement, the door must be removed.
Possible error codes are 1, E1, E01, Err 1, Error 1. Although in most cases, no additional prompts are needed.
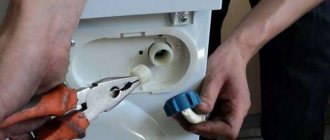
Pump or pump
The pump or pump is responsible for pumping water out of the drum and discharging it into the drain pipe . The part is located at the bottom of the device; you can access it after completely disassembling the washing machine.
The most common cause of failure is debris that gets into the part. Foreign objects either simply block the operation of the pump, or cause the impeller to break, or disable the motor, which is subject to excessive loads.
If the pump breaks down, the water will not drain or will leave the drum more slowly than usual. In this case, a code will appear on the screen - 3, E3, E03, Err3, Error 3, or similar letters, but with the number 20.
To eliminate the malfunction, the device must be disassembled, the pump removed and inspected. If a blockage is detected, the pump should be cleaned. A breakdown of the impeller or motor requires replacement of the part.
Engine
The motor is one of the main components of the Kandy washing machine. It is this that is the source of energy that sets the drum in motion. The most common reasons for its failure are short circuits . They can occur in the rotor and stater windings due to voltage surges, overloading of the washing machine, and even improper installation.
The main sign of a motor malfunction is the termination of any program. After diagnosing the breakdown, repairs are carried out. Most often, a complete engine replacement is required. Possible error codes are 8, E8, E08, Err 8, Error 8 or similar letter designations, but with the numbers 9 or 10.
Brushes
Brushes are necessary to transfer voltage from the stator to the rotor. They are made of graphite, so they wear out over time.
Worn brushes in Kandy washing machines are indicated by weak spin. If they are worn down too much, the drum will not rotate at all , since the motor will not have enough power. Sometimes sparks are visible under the machine.
There are no specific reasons leading to brush abrasion. This is a natural process that accelerates with active use of the device. The brushes cannot be repaired and must be replaced. Error codes indicating brush wear are 8, E8, E08, Err8, Error 8.
Bearing
The bearings allow the drum to rotate smoothly and silently . Its breakdown is indicated by loud sounds in the form of roaring and grinding. They intensify during spinning. If the bearings fail completely, the drum stops rotating.
The causes of failure are excessive loads on the elements, for example, when the machine is overfilled with laundry. An additional risk factor is moisture ingress. You need to understand that over time, even the best quality bearings break down. They cannot be repaired; the part must be replaced. Error codes indicating bearing failure are 7, E7, E07, Err7, Error 7. Details are in this article.
Shock absorbers
Shock absorbers or dampers are designed to dampen vibrations of the tank during spinning and washing. They work in conjunction with springs. Damage to the shock absorbers is indicated by strong vibrations and knocking noises during spinning. In this case, the device itself can “jump” and move from its place.
Reasons for their failure:
- drum overload,
- spin at high speeds,
- placing the device on an uneven surface,
- resource development.
Repair of shock absorbers is impossible; they must be replaced. There are no error codes indicating damage to the shock absorbers. To make a diagnosis, you will have to focus on external signs.
Read about repair and replacement of shock absorbers here.
Cuff
The elastic band located around the circumference of the hatch is a cuff. It helps the door close tightly and prevents leaks.
The most common reason for damage to its integrity is the carelessness of the owner of the washing machine, who leaves sharp objects in his pockets. It is they who cut the seal during the washing process.
The main sign of cuff damage is leakage . If the gap is minimal, you can seal it and turn the elastic band over so that the hole is on top. If there is significant damage to the integrity of the rubber band, it will have to be replaced. There is no error code, but in this case diagnosis is not difficult.
Drum
If the drum breaks down, it may stop rotating, when it moves, extraneous noise appears, and water begins to stagnate in it. Sometimes it begins to leak due to a hole, or becomes deformed. The main cause of the malfunction is violation of operating rules. Repair comes down to replacing a part. Error codes indicating problems with the drum are 10, E10, Err 10, Error 10.
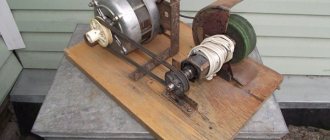
Candy motor repair
Checking the brushes. To do this, we put the car on its side and we have access to the engine.
Using a multimeter, we measure the integrity of the brush and commutator circuit. To do this, set the tester to resistance measurement mode and measure the resistance between the brushes. If they are pressed against the collector, which means they are working, then the tester will show zero resistance, but if they are not pressed against the collector (thus they are faulty), the tester will show one.
We see that the tester shows 1, which means the circuit is broken, the motor brushes need to be replaced.
We put the car on its legs, remove the back wall, to do this we unscrew the screws around the perimeter of the back wall.
Now we have full access to the motor, as you can see in the photo below, I have already removed the belt.
Since the wall has been removed, let’s not be lazy and check whether the heating element is working properly. The machine is not new and it is quite possible that the heating element is also faulty, and the client does not pay attention to the fact that there is no water heating and the laundry has become worse to wash.
We remove the terminals, take a multimeter and measure the resistance at the ends of the heating element, it should be about 30 ohms.
We see that the ten is also faulty, it also needs to be replaced. In this article I will not describe this process; you can read about it in detail in another article here.
Remove the motor power connector.
Next, unscrew the engine mounting nut and remove it from the tank.
The brushes are located at the rear of the unit in plastic cases opposite each other and are screwed to the case with screws.
Unscrew the screws and remove them.
The graphite brushes are very worn.
The next photo shows how worn the old one is compared to the new one.
The material of the brushes is graphite, over time it wears off and the brush stops pressing against the commutator, as a result of which the integrity of the circuit is disrupted. With such a defect, the machine does not generate an error.
We install new brushes, but we also need to eliminate the wear on the commutator, which was formed due to friction between the brush and the commutator.
We will sand the collector with sandpaper. You can grind manually or using a motor connected to an electrical network.
In the first case, press the skin tightly to the surface with one hand and rotate the motor shaft with the other hand.
I will polish on a mains-powered engine. This option requires great care and caution; if you are not confident in your abilities, then polish by hand, or seek help from a washing machine repairman.
The engine is connected according to the following diagram:
- the motor connector has six pins, of which 2 pins are from the hall sensor, 2 from brushes, 2 from windings;
- one brush and one winding with each other ;
- connect the power cord with a plug to the other pair;
- We place the unit on a flat surface and plug in the plug into a 220 V network, take care of your hands.
The engine is running, its shaft is rotating, now we take the sandpaper and gently but firmly press it against the surface of the commutator.
Polishing happens very quickly. The result is in the photo below.
We install the engine in place, assemble and check the machine. I wish you success in the repair.
Source
Possible malfunctions of the Kandy washing machine
If a part breaks in a Kandy washing machine, this is manifested by a specific set of symptoms. For example, if the heating element breaks down, the water will not heat up, and if there is strong vibration, the device makes a lot of noise and vibrates during spinning. Knowing what malfunctions indicate, you can easily repair household appliances .
Doesn't heat water
When the washing machine does not heat the water, in 95% of cases this is due to a breakdown of the heating element. This can be confirmed by error codes - 5, E5, E05, Err5, Error 5. Less commonly, lack of heating indicates a malfunction of the pressure switch or control module. To find out the reason, you need to disassemble the device.
First, you should check the quality of fixation of the electric heater, as well as the integrity of its wires. If the part itself is broken, it must be replaced. The same algorithm is used to diagnose the water level sensor and controller.
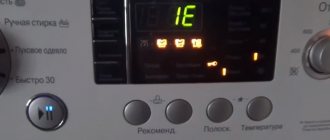
The castle is on fire
The "lock" icon appears during washing . It signals that the washing machine is locked and it is impossible to open it until the cycle completes. In this case, no action needs to be taken.
If the “lock” is displayed after the end of the program and the machine cannot be opened, or it freezes, it is possible that the controller has malfunctioned. In this case, the device must be rebooted. Most often the problem goes away on its own.
Another reason for the “lock” to blink is when the child lock feature is activated . In this case, all buttons remain inactive even when pressed. It is enough to remove the blocking to solve the problem.
If the lock indicator flashes or lights up, but the hatch does not open or close, you should check the UBL. It may have failed and needs to be replaced. In this case, code 1, E1, E01, Err1, Error 1 will appear on the display.
Flowing
A washing machine leak never just happens. Water in the pan may appear due to the following reasons:
- the drain system is clogged - error code 3, E3, E03, Err3, Error 3, or similar letters, but with the number 20;
- the drain pipe has burst - the error codes are the same as for a blockage.
First, you need to disconnect the device from the power supply, and then check the pipe and pump for blockages and damage to integrity. If a breakthrough occurs, the part will have to be replaced.
Doesn't wring out
The reasons why the Kandy washing machine does not spin things out may be as follows:
- Spin is not provided for by the selected washing mode, or is simply disabled.
- There are too many things in the drum, causing its axis to shift. In top-loading washing machines, code 10, E10, Err10, Error 10 may appear.
- Due to a network outage, the control board malfunctioned. To deal with the problem, you need to restart the machine. Error codes – 14, E14, Err14, Error 14.
- The brushes, oil seal, crosspiece or bearings have exhausted their service life. They need to be replaced; repair is not possible. Error codes indicating bearing failure – 7, E7, E07, Err7, Error 7. Error codes indicating brush wear – 8, E8, E08, Err8, Error 8.
- Problems with the belt. It can stretch or fly off; to understand what happened, you need to assess its condition visually by twisting the back wall of the device.
- The tachogenerator is broken or is not sending signals correctly. Error codes – 17, E17, Err17, Error 17 or similar, but with the number 8. It cannot be repaired; you need to buy a new part.
- The shock absorbers have broken down. These parts cannot be repaired and will have to be replaced.
This publication will tell you why the Kandy washing machine does not spin clothes and what to do.
Freezes
If the Kandy washing machine freezes, this may be due to various reasons, including:
There is too much laundry in the drum, or it is bunched up. The weight control sensor stopped the operation of the device to prevent serious damage. If this is the case, some things need to be removed.- Drain and spin are disabled. In this case, the drum will stop along with the water. You need to check whether the selected mode is correct.
- The device is frozen and does not draw water. Most likely the pressure switch is broken. Error codes - 20, E20, Err20, Error 2.
- The machine does not work and does not heat the water. The most common cause of a malfunction is a breakdown of the heating element. Error codes: 5, E5, E05, Err5, Error 5, or the same letters, but with the number 14, 16 or 22.
- The tank remains motionless, the program is not executed, the machine is frozen. Most often this occurs due to a foreign object getting between the tank and the drum. The interfering part must be removed.
- Brush wear or motor failure. Brushes are consumables, you will have to purchase new components. You can try to repair the motor. Error codes indicating a breakdown of the motor and brushes: 8, E8, E08, Err 8, Error 8 or similar letter designations, but with the numbers 9 or 10.
- The control board is faulty. Perhaps its malfunction occurred due to a power surge. In this case, you can deal with the “freezing” of the washing machine by rebooting it. If the board breaks down, it needs to be repaired. Error codes – 14, E14, Err14, Error 14.
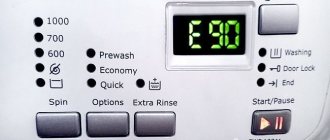
Doesn't turn on
If the Kandy washing machine does not turn on, it is necessary to exclude elementary reasons such as lack of electricity and a broken button that starts it up. A more complicated situation is a faulty control board.
When household appliances do not show any signs, most likely the module has completely failed and cannot be repaired. It will have to be replaced completely. Such repairs will be expensive for the owner of the device.
The machine may not turn on due to a faulty power cord or broken wires inside the device. They need to be found and replaced. Details are in this article.
Doesn't take up water
When the machine does not draw water, you should not immediately proceed to complex diagnostics. The water supply may have been cut off throughout the entire house. Sometimes the reason for its absence is even simpler - the supply hose is pinched by a foreign object, or the valve is closed. Fixing these problems will not be difficult.
More serious reasons why water will not fill the tank:
failure of the controller - in this case, the equipment needs to be rebooted;- there is a blockage in the area of the water supply valve - it needs to be cleaned;
- breakdown of the water level sensor - it cannot be repaired, it must be replaced, error codes - 2, E2, Err02, Error 2 or 20, E20, Err20, Error 20;
- failure of the UBL - in this case the door will remain open and water will not be drawn in, error codes - 1, E1, E01, Err1, Error 1.
Noisy
The strange noise that the machine makes during the spin cycle is most often associated with wear on the oil seal and bearings. If extraneous sounds are detected, you need to start diagnosing as soon as possible. Error codes indicating bearing failure are 7, E7, E07, Err7, Error 7.
Other, less common causes of extraneous noise:
- The machine is standing on an uneven floor. Correction of its position is required.
- The device is new, the wash was started with the transport bolts not removed.
- There is a foreign object in the drum.
- The bolts securing the counterweights have become loose.
Doesn't drain water
If the water remains in the machine after the wash cycle has completed, you need to wait a while. Sometimes the device simply processes the operation and after a few minutes the drain will start.
Provided that it was not possible to wait for the program to complete, several reasons should be considered:
- A blockage has formed in the area of the drain pump, or it has failed. In this case, a code will appear on the screen - 3, E3, E03, Err3, Error 3, or similar letters, but with the number 20.
- The drain hose is kinked or pinched.
- The pressure switch has failed. It needs to be twisted and checked for functionality. If a breakdown is detected, the part is replaced.
- The wires or contacts leading to the control board have come loose. They must be returned to their original position.
This publication will tell you why the Kandy washing machine does not drain water and what to do about it.
The door won't open
If the hatch cannot be opened after the end of the cycle, this may be due to several reasons:
- the control board is frozen because there was a power failure - a reboot is required to fix the problem;
- there is water in the appliance, which makes it impossible to open the door - most likely, the drainage system is faulty;
- The hatch locking device has failed.
The door may not open because the child lock is on. After turning it off, everything will return to normal. Read more here.
Jumps or vibrates strongly when spinning
If during a spin cycle the machine moves due to strong vibration, the reasons may be the following:
- The drum is overloaded with things. If this is indeed the case, the device must be stopped and some of the clothing removed.
- Installation on an uneven surface. To stop the device from vibrating, the leg needs to be adjusted.
- The counterweight screws have loosened.
- The shock absorbers are worn out.
- The bearings have exhausted their service life. Error codes indicating their failure are 7, E7, E07, Err7, Error 7.
Functional test of the pressure sensor (pressostat)
Pressure switches are used to control the amount of water poured into the machine (Fig. 12).
For the entire existing model range of washing machines and washing machines with dryers, Candy designed pressure switches that use only 2 levels, with similar technical characteristics, but different designs, depending on the type and characteristics of the machine. The position and number of connecting pins may also vary depending on the manufacturer. Rice. 12Pressostat
WARNING:
When replacing a pressure switch, use only original spare parts, any replacement of a pressure switch with a similar one must be agreed with GIASTECH, or the replacement must be made in accordance with the written recommendations of GIAS.
If the pressure switch is replaced with a non-original one without the official approval of GIAS (Italy), Candy voids the warranty and releases itself from any legal liability and related claims.
Possible tests that can be performed on pressure switches are the following:
CHECKING ELECTRICAL CONNECTIONS: The location and numbering of the pressure switch contacts may vary between different manufacturers. There are two possible configurations, they are shown in Figure 13.
Please always refer to the GIASTECH wiring diagrams for the device, in any case of doubt about the correctness of the electrical connections to the pressure switch.
Rice. 13Options for pressure switches
| LOCATION AND PURPOSE OF PRESS CONTACTS: Pin 1: "COMMON" pin Contact 2: “CONTACT EMPTY TANK” (not used) Contact 3: “CONTACT FULL TANK” (1st Level) Contact 4: “EMERGENCY LEVEL CONTACT (LEAKAGE PROTECTION)” (2nd Level) |
| CHECKING THE PRESSOSTAT: (Fig. 14) Set the multimeter to dial mode (with signal): 1 – 2 (closed circuit) 1 – 3 (open circuit) 1 – 4 (open circuit) |
Rice. 14Checking pressure switches
Features of repair of equipment with vertical loading
Kandy top-loading washing machines have some differences in repair due to the location of parts:
- Such devices have a built-in drum parking sensor, which may fail.
- If the doors are opened during the washing process, this may cause the drum to jam. To fix the problem, you will have to completely disassemble the machine.
- The control board is located close to the top of the body, making it easier to access than with front-loading machines.
- If the drum leaks, the main components located under it may be damaged. Therefore, you need to ensure that foreign objects do not get inside.
Since the drum is located on top of the washing machine, overload cannot be allowed. Otherwise, repairs will be expensive.
Functional testing of hatch locking devices
Door lock devices are included as a safety requirement on every washer and washer dryer. This prevents the machine door from opening during the wash cycle. Once the wash cycle has finished (or as soon as it is manually stopped by the user), the door lock device keeps the door closed for a few additional minutes due to a set delay.
This is because the sunroof interlock device operates on a bimetallic component with a positive thermal coefficient that heats up when mains voltage is applied to it, but it takes a few minutes to cool down after the voltage is removed from it. Heating the bimetallic element causes its deformation, which pushes out the gripping device that blocks the door.
CHECKING THE HATCH LOCKING DEVICES:
|
READ MORE: Heaters that do not burn oxygen - what they are, how they work, the best models and reviews, where to buy
Hatch locking deviceUsed on front-loading machines with a door release button on the control panel. This device is installed BEHIND THE DOOR BUTTON. As soon as the device is energized, the lock extends and the door open button cannot be pressed. Resistance (at 25°C): ~8000 Ω When voltage is applied to the device, visually check that the lock is pulled out of the device. | |
Hatch locking deviceP/n. 91202008Used on front-loading machines with manual opening of the hatch door. As soon as mains voltage appears on pins 1 – 3, the inner tongue protrudes and mechanically locks the door. In this case, the internal mechanism closes its electrical contacts 1 - 2. WITHOUT VOLTAGE: resistance between pins 1 – 3 at 25°C, between 500 Ω and 1500 Ω. Contacts 1 and 2 are not closed. WHEN SUPPLYING POWER: Apply voltage to the device for 2 minutes (pins 1-3), and monitor the resistance between pins 1 and 2, they should close. Turn off the power and check for a closed circuit between pins 1 and 2 for 30 seconds, after which it should open. | |
Hatch locking deviceP/n. 90489300Used on front-loading machines with a door release button on the control panel and a Bowden cable. As soon as mains voltage appears on pins 1 – 3, the inner tongue protrudes and mechanically locks the door. In this case, the internal mechanism closes its electrical contacts 1 - 2. WITHOUT VOLTAGE: resistance between pins 1 – 3 at 25°C, between 500 Ω and 1500 Ω. Contacts 1 and 2 are not closed. WHEN SUPPLYING POWER: Apply voltage to the device for 2 minutes (pins 1 – 3) and monitor the resistance between pins 1 and 2, they should close. Turn off the power and check for a closed circuit between pins 1 and 2 for 30 seconds, after which it should open. | |
Hatch locking deviceFor use on top loading machines. As soon as mains voltage appears on pins 3 – 5, the inner tongue protrudes and mechanically locks the door. In this case, the internal mechanism closes its electrical contacts 4 – 5. WITHOUT VOLTAGE: resistance between pins 3 - 5 at 25°C, within 800 Ω - 1200 Ω. Contacts 5 and 4 are not closed. WHEN SUPPLYING POWER: Apply voltage to the device for 2 minutes (pins 3 - 5), and monitor the resistance between pins 4 and 5, they should close. Turn off the power and check for a closed circuit between pins 4 and 5 for 30 seconds, after which it should open. | |
Hatch locking deviceP/n. 80049349For use on top loading machines. As soon as mains voltage appears on pins 3 – 5, the inner tongue protrudes and mechanically locks the door. In this case, the internal mechanism closes its electrical contacts 4 – 5. WITHOUT VOLTAGE: resistance between pins 3 - 5 at 25°C, within 800 Ω - 1200 Ω. Contacts 5 and 4 are not closed. WHEN SUPPLYING POWER: Apply voltage to the device for 2 minutes (pins 3 - 5), and monitor the resistance between pins 4 and 5, they should close. Turn off the power and check for a closed circuit between pins 4 and 5 for 30 seconds, after which it should open. This hatch locking device is completely interchangeable with the previously shown P/N hatch locking device. 80049349. |
How to disassemble a household appliance?
Analysis of SMA Kandi involves the following algorithm of action:
remove the top cover, which is secured with a pair of bolts from the back of the device;- get the powder receptacle;
- unscrew the water level sensor;
- remove the panel with buttons;
- carefully remove the counterweight, which is secured with bolts;
- disconnect the surge protector;
- turn off the filling valve;
- unscrew the back panel, remove the belt, disconnect the motor and heating element;
- using a screwdriver, unscrew the bolts securing the hatch - if there is no need to remove it, then leave the door on the front panel;
- disconnect the inlet hose;
- unscrew the counterweights;
- remove the tank from the shock absorbers and remove it.
The two halves of the tank are fixed with bolts; if necessary, they need to be unscrewed. This way the machine will be disassembled. Read more here.
Features of the program implementation
Candy is an automatic machine that, without outside intervention, is capable of completing all stages of washing clothes. Sometimes technology fails. Some of them can be dealt with on your own, while others are a reason to call a professional technician.
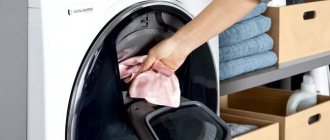
All pockets must be empty; clothing cannot have removable decorative elements (pins, stickers, brooches) that are easily detached. Then detergent is poured or poured into a special compartment. The chemical composition will be washed out of the tray while the machine is operating; when switching to the rinsing mode, the powder will be completely used up. The user plugs the device into the outlet, opens the water tap (if it was closed) and starts the selected washing mode.
The equipment independently draws water, washes, rinses and spins washed clothes. Each mode assumes a specific algorithm for the device’s actions, programmed by the manufacturer. The heating element heats the water to the set temperature, and the main wash begins. The drum rotates, so the laundry is constantly rinsed in a solution of powder and water, cleansing it of dirt.
When the main wash is finished, a special valve opens and the pump drains the liquid. If there is no moisture left in the tank, clean water is supplied through the outlet valve. The pressure switch monitors the water level, and when a certain volume is reached, rinsing starts. This stage is repeated several times.
When should you change the hose?
If the drain hose is clogged with debris, hair, threads or other contaminants, it is not a reason to replace it . To restore passability, you just need to clean it with a stream of hot water. It will not be possible to do without replacing the hose if the blockage is formed by limescale. Removing it is problematic, and effective means for dissolving scale can damage the hose.
Another reason to buy a new hose is if it breaks. It will not be possible to seal the drain tube; it will still leak. Sometimes you have to purchase a new hose immediately after purchasing a washing machine, since it is not long enough.
If the warranty period has expired
If the warranty period has expired, the board will have to be repaired at your own expense. If you have knowledge in the field of electronics or if there is a simple breakdown, you can do the work yourself. It is better to entrust the solution of global problems to a specialist.
How to disassemble a household appliance?
To assess the condition of the board, it needs to be inspected. To get to it, do the following:
dismantle the top cover of the device - it is fixed with two bolts, which are unscrewed with a screwdriver;- the board is located on the left in the corner, if you stand behind the machine, facing it;
- although the module is visible, to gain access it is necessary to remove the rear and front walls of the device along with the hatch;
- When all obstacles have been removed, the wires are disconnected from the part and carefully removed.
The module must be handled with care so as not to accidentally damage it. Experts recommend laying the machine on its side, this will make it easier to get to the desired part.
Removal and diagnostics of the electronic unit
Since there are many wires going to the module, they need to be disconnected in order . In order not to confuse the terminals later, it is better to take photos or videos of the entire process. This is especially true for craftsmen with little experience.
Diagnosis begins with an examination. Sometimes a defect can be visualized without special equipment; for example, it is easy to detect a swollen capacitor, a broken solder joint, or a burnt-out track. If possible, you should find a diagram of the module of the model being repaired and keep it before your eyes.
How to repair?
On your own, you can cope with problems such as:
- Resoldering capacitors . They are the first to suffer during voltage surges. If an element fails, it swells. To clarify the data, you can ring it with a multimeter and then replace it.
- First and second order resistors . 1st order resistors should have a resistance of 8 Ohms - 2A, and 2nd order resistors of 10 Ohms - 5 A. If there are deviations, the elements are changed.
- Thyristor commutator It is damaged by power surges.
- Trigger. Normally, its resistance is 20 ohms.
These items must be replaced. In addition, you can clean the tracks and remove carbon deposits. Sometimes this is enough to normalize the operation of the module.
Firming a chamber is a complex job, which can only be accomplished with special knowledge and equipment. To reprogram, you will need a special programmer adapter, as well as original Candy software.
Repairing the electronic module of the Candy washing machine, video instructions:
How to change a part?
If the control module cannot be repaired, it will have to be replaced. The cost of the part is about 8,000 rubles . You can purchase it in specialized stores or on websites.
Board replacement is very fast. It is enough to connect the terminals and install it in its original place. Then the machine is assembled in the reverse order. After repair, you should check the functionality of the device by running a short wash cycle.
Should I repair it myself or call a professional?
You can repair the washing machine yourself if the breakdown is simple, for example, the pressure switch has failed or the wires have come loose. In other cases, it is better to seek qualified help. You should also know what to do if the machine is still under warranty.
The machine is under warranty
The warranty period for Candy washing machines is 1 year . During this period, the manufacturer undertakes to eliminate all breakdowns at his own expense, but only on the condition that they were not caused by the owner of the household appliance himself.
To receive free service, you cannot attempt to set up the machine on your own. If specialists notice that the case has been opened, they will refuse to repair it.
Therefore, if you discover a manufacturing defect, you should immediately contact the retail outlet where the purchase was made or a branded service center. You must have a receipt with you, stamped with the date of purchase.
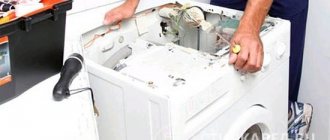
Do-it-yourself home repairs
Repairing at home is always convenient for the owner of household appliances, there are several reasons for this:
- The specialist will repair the only washing machine. It is in his interest to get the job done quickly.
- The user will not have to worry that some parts will be twisted and replaced with old ones. Everything happens before his eyes.
- The work will be paid only after the owner is convinced that the device is in working order.
- The machine has an impressive weight. When repairing at home, you do not have to take it to the workshop.
However, home repair has its disadvantages, namely:
- a scammer may be hiding behind a private ad;
- the technician will have to pay for the visit and diagnostics;
- the amount will be higher, since travel costs are already included in the cost of repair work;
- private craftsmen most often do not provide any guarantees.
To minimize the risk of meeting with an unscrupulous master, you need to read reviews about his work. If possible, it is better to contact those specialists who have already repaired household appliances for relatives or friends.
If a person values his reputation, he will not inflate prices, always provide receipts for replaced parts and will not inflate the cost of work.
Repair at the service center
Repairing a washing machine at a service center has several advantages:
All work is guaranteed for at least a year.- Spare parts will be replaced with originals, the user will not have to wait for their delivery. In large centers, components are always available.
- The risk of encountering scammers is minimal.
- Reputable organizations employ only professional craftsmen.
Among the disadvantages:
- You will have to transport the machine yourself to the service.
- Large workshops are loaded with orders, so the deadline for completing work may be delayed.
- The cost of work is higher than that of private owners.
If the choice falls on a service center, then you should contact a trusted organization that has been operating for many years. As a rule, such companies are well known in every city.
Help with a diagram of the control unit sma Candy cs2 094
Solution
Buy spare parts and tools
Wholesale prices from 10 tr. automatically, same-day dispatch by Russian Post, SDEK, PEK
Comments (3)
Your comment +5
When starting the program, an element exploded. The markings are no longer visible. Only the last 2 digits are 44. Maybe someone has one that is being repaired or disassembled. You can take a look.
On this machine, the processor burned out due to water. I changed the percentage, I need firmware for it. Module W11090222/B WAVE_ECO_T K5 SW: L2148 09 00 L1799_S.
I'm wondering why there is a reed switch on the refrigerator control board if there is no magnet nearby?
After replacing the heating element, SMA oko lavamat 85739 began to display the CC error. I can’t find what is causing this error to appear immediately after turning on the machine.
Need help identifying a possible problem. This machine behaves unpredictably in each of the programs I turn on. When you turn on fast 15 m.
Good afternoon. We need a diagram of the main board for the Haier AFL631NF refrigerator. The board says CQC08001022336 ZD95GF (its code is 0061800014) R15, R10, R12 are burned out. Which.
Source
Causes and prevention of breakdown
The control board in Kandy washing machines may fail due to the following reasons:
Marriage. It will not be difficult for a specialist to detect it.
Defective boards are poorly soldered, the tracks on them peel off. The fact that the plant did a poor job can be understood from the first weeks or even days of using the device. It will function intermittently.- Voltage fluctuations . Network surges negatively affect all components of the washing machine. The payment suffers first of all. If such drops occur frequently, then installing a voltage stabilizer is necessary.
- Incorrect operation of one or more parts . Over time, a malfunction in their functioning will affect the electronic module. To avoid such situations, any repairs must be carried out on time.
- Liquid gets on the board . Modern SMA models are protected from moisture, but not 100%. If water gets on the module, and at this moment the device is turned on, it will not be possible to avoid damage. To prevent costly repairs, you need to transport and operate the machine in accordance with the User Manual.
- Software failure . Electronics are complex and sometimes malfunctions occur. To minimize risks, you need to use only official applications and programs to control your washing machine.
- Insect excrement, such as cockroaches, gets on the board . When the board is turned on, it heats up, causing carbon deposits to form in places where it is dirty. This situation can be prevented by fighting insects and rodents.
Call a specialist, price of work
If there is no knowledge of electronics, repairs should be entrusted to professionals. Finding a master is not difficult, just open a bulletin board on the Internet . Proposals are also published in newspapers. Sometimes friends who have already used the services of a specialist come to the rescue.
The average cost of replacing a module is 2,500 rubles. The part will have to be purchased separately. Repairs can be carried out both at home and in a service center.
To minimize the likelihood of encountering scammers, it is better to contact large organizations that have long established themselves in the market.