Automatic washing machines make a significant contribution in helping us manage our household chores. For many years, they carry significant loads of washing clothes, helping us save a lot of time and effort. But there comes a time when our washing unit, due to long-term operation, lets us know about the need for its routine maintenance.
One such sign is increased, gradually increasing noise during operation. First, the noise level becomes prohibitive in the spin mode, and then it can be heard at normal washing speeds. The reason for this behavior of the machine is a bearing unit worn out by long-term operation.
There is no point in delaying this problem due to the seriousness of the breakdown; if we fail to eliminate it in a timely manner, we doom ourselves to additional costs to eliminate additional collateral faults.
As in other machines, bearings for the Atlant washing machine can be changed with your own hands at home.
Disassembling the Atlant washing machine will take a significant part of your time, but you will be pleased with the saved budget.
How to disassemble the Atlant washing machine
To disassemble the Atlant washing machine, you don’t need fancy tools, just ordinary screwdrivers, socket heads and a few other devices.
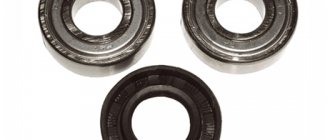
To quickly complete the entire procedure, it is advisable to purchase a new set of bearings and oil seal in advance.
The necessary parts can be purchased in specialized stores or services by telling the seller only the brand and model of your product. You should not save on new components, because you are already saving on DIY repairs and parts of dubious origin will lead you to this procedure again in the near future.
Bearings for washing machines carry a huge load and when choosing their quality, special attention is paid in production.
Repairs must begin by disconnecting the device from the outlet and other communications:
- Unscrew the top cover of the product and remove it from the body, moving it away from you a couple of centimeters (it is secured by 2 screws in the rear end part of the cover);
- Remove the powder tray and unscrew the screws securing the hopper under it;
- Next, dismantle the upper front panel;
- Unscrew and remove the spacer metal cross bars;
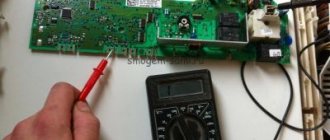
- We remove the electronic control unit from the inside of the case on the right, first disconnect the thin hose from it;
- Remove the top concrete weighting material;
- Disconnect the tray hopper from the hoses and remove it outside;
- We remove the outer clamp of the hatch cuff and tuck the elastic band inside the machine body;
- Remove the back cover of the washing machine;
- Disconnects the wires from the heating element and temperature sensor, rewrite the correctness for subsequent connection (it is better to take a photo);
- Unscrew the engine mounting bolts and remove it from its hinges;
- Loosen the hose clamp on the tank (hose to the pump);
- The shock absorbers can be unscrewed from both the tank and the body, but you don’t have to touch them at all (their rods will come out of the bodies themselves).
Possible difficulties
Difficulties that you may encounter when repairing the bearings of an Atlant washing machine:
- screws and screws for fixing different parts differ in length and size - to avoid confusion, they are folded onto separate sheets and labeled;
- if the bolts are rusty, you should not try to twist them by force - first they are treated with VD-40 lubricant, after 5 minutes the attempt is repeated;
- the new bearing does not fit in size - a similar situation arises if a part was purchased that is intended for a machine of a different brand; if the integrity of the part and packaging is not compromised and the receipts are preserved, you can try to replace the bearing.
Change the bearing on the Atlant washing machine
In Atlant washing machines, the tank has a collapsible design, which makes it easier to carry out repairs to replace the bearing in its hub. To disassemble it into two halves, you need to unscrew about two dozen bolts around its perimeter.
Then we simply separate the halves of the tank and put the front one aside, our further actions will be directed towards the rear part of the tank with the wheel bearings:
- Unscrew the bolt securing the drum pulley and remove the wheel by shaking;
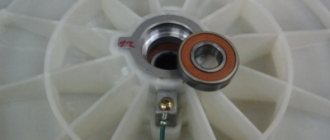
- We screw a similar one in place of the bolt, and hit it with a hammer to knock the drum shaft out of the bearings. After removing the drum from the tank, we pay attention to the condition of its shaft and the brass bushing on it. The bushing must have a smooth, even surface; if the surface of the part is damaged, it is necessary to replace it or the entire drum cross;
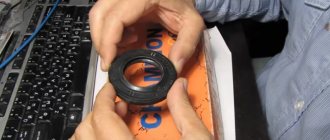
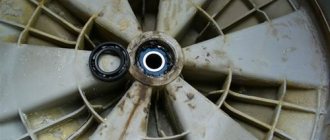
- Then, using a minus screwdriver, remove the oil seal from the hub;
- Using a hammer and chisel (or a piece of thick-walled metal pipe), we knock out the old worn bearings from the hub. You need to knock them out by hitting them “crosswise” around the circumference of the inner race of the part, having previously lubricated the hub to facilitate the release of the bearing from the tank;
- Afterwards, it is necessary to clean the hub and the junction of the tank halves from foreign deposits and dirt.
How to change on a washing machine with direct and belt drive?
There is no significant difference between replacing bearings in a direct drive machine and a belt drive machine. The main difference is the absence of a belt and the direct connection of the drum to the motor. Therefore, in devices with a commutator motor, the belt will have to be removed during disassembly, and with direct drive, the motor itself will have to be removed.
Preparation
Preparing the Atlant washing machine for the upcoming bearing replacement involves the following steps:
- turn off the water supply tap, if installed;
- disconnect the machine from the power supply;
- remove the laundry from the drum, drain the remaining water;
- remove the drain hose from the sewer;
- move the device away from the wall, furniture and other interior items that will interfere with the disassembly process.
Tools and materials that will be required for repairs:
- screwdrivers of different shapes;
- pliers;
- hammer and chisel;
- awl;
- a metal rod or other adapter for knocking out bearings.
To facilitate the work and improve its quality, use VD-40 lubricant and sealant. If there is not enough experience in repairing washing machines, the entire process should be filmed or photographed the details of connecting parts. This will help you avoid getting confused during the process of reassembling the device.
If possible, it is better to carry out repairs not in the apartment, but in the garage or in the courtyard of the house, where there is a lot of free space and there is no risk of damaging the flooring. When dismantling a washing machine in an apartment, the floor is covered with cardboard and unnecessary rags.
Disassembly
When all preparatory activities are completed, you can begin disassembling the Atlant washing machine. Algorithm of actions:
- Remove the top cover. It is held in place by 2 bolts, which can be found on the back wall. After twisting them, the panel is moved to the side and lifted up.
- Remove the control panel. First you need to remove the powder receptacle. It is pulled out by pressing the plastic latch located in the central part. In the seat for the tray you can find bolts that need to be unscrewed. They are the ones that hold the front panel. All that remains is to remove the terminals with the wires and slide it off the plastic latches.
- Remove the back wall. It is held in place by 6 bolts that need to be unscrewed. Behind it are hidden such parts as: a motor, a belt, a water intake valve, a pressure switch, pipes and counterweights. Some of the listed parts will be visible after twisting the cover, but it is more convenient to dismantle them after removing the back wall. All of the above components are fixed with bolts that will have to be unscrewed.
- Remove the front panel. First, twist the hatch door, remove the cuff and UBL. Then you can begin to remove the pump, which is located at the bottom of the device.
- Tighten the heating element, shock absorbers and drain pipe. For convenience, you can turn the machine on its side.
- Remove the tank by removing it from the shock absorbers.
- Unscrew the two parts of the tank that are connected to each other with bolts.
- Remove the pulley. To do this, use a hex key.
How to remove the part?
When the drum is in direct access, you can begin dismantling the bearings. The procedure is as follows:
- Using a flat screwdriver, remove the oil seal from the socket;
- fill the bearing with VD-40 - the lubricant will facilitate the process of removing it;
- fix the drum so that it does not wobble, knock out the bearing - first remove the larger element, strikes with a hammer on the chisel should be aimed and strong, when the outer ring can be removed, begin to remove the smaller bearing.
Experts recommend hitting the hammer crosswise along the contour of the bearing. You cannot hit the same place, so as not to deform it.
How to replace it yourself?
After dismantling the faulty bearing assembly, the seat is cleaned of any accumulation of rust, dirt and scale. Procedure for installing a new bearing:
- Treat the socket with lubricant.
- Insert the bearing into the seat so that it fits smoothly, without distortions.
- The part is driven in with a hammer blow. It will not be possible to install it the first time, so the tapping continues until the bearing fits into the socket. You can understand that it has entered the clip by the sound of the hammer blows: it will become louder and sharper.
- Install a new oil seal.
Assembly of the Atlant washing machine
Reassemble the washing machine in reverse order. But when installing the tank, the first step is to direct the shock absorber rods into their bodies, and then hang them on the springs. Connect the wiring based on your notes or photographs.
It is recommended to photograph the entire disassembly process, this will maximally ensure the correctness of the subsequent assembly of the unit.
If assembly is incorrect, especially incorrectly connecting wires, you may incur additional costs for damaged parts.
After assembling the product, you need to keep it without use for the period of time that the sealant manufacturer guarantees for it to completely harden. Then connect the device to all communications and do a test wash with a small amount of detergent.
This is done in order to remove possible dirt from the car and unpleasant odors resulting from the drying of the sealant.
If, after a test wash, no traces of moisture formed under the machine and it completed the program with an acceptable noise level, then replacing the bearing in the Atlant washing machine with your own hands was done at the proper level.
Symptoms of a problem
Bearing wear in an Atlant washing machine begins with damage to the oil seal, so it will not be possible to do without replacing it. Its deformation leads to the fact that the metal ring begins to come into contact with water, rusts, and the friction force increases. As a result, the part quickly loses the ability to perform its functions normally.
Signs indicating bearing wear:
During operation, the device makes strange sounds: rumbles, creaks, knocks.- The vibration increases and the machine constantly moves from its place.
- When pressing on the top and bottom of the drum, play is felt.
- Drum jamming. This is the terminal stage of bearing failure. When you turn on the device, the machine refuses to wash and leaks.
The average bearing life is 5-6 years. This process is accelerated by regular drum overloads, manufacturing defects, and untimely replacement of parts.
Although the Atlant washing machine is equipped with a self-diagnosis function, there is no error code for bearing failure. Signs of their wear appear quite clearly , so it is impossible not to notice them.
Recommendations for using the washing machine
To increase the service life of the machine, it is enough to follow several important rules:
- Do not overload the washing machine drum beyond the norm established by the manufacturer. The fact is that few people read the instructions included with the product in full. They describe how much and what kind of laundry can be washed at a time. And there is no need to strain the machine with full permissible loads; three quarters of the nominal weight will have a beneficial effect not only on the technical condition of your assistant, but will improve the quality of washing things. There is no need to be afraid of excessive consumption of electricity; for a long wash at 60 degrees, the device consumes from 0.5 to 1 kW of electricity;
- Use high-quality water and detergents when washing. This will improve washing results and limit the formation of scale deposits on the inside of the washing machine. If necessary, you need to install additional filters to soften the water. It is also necessary to carry out preventive measures against scale and other unwanted deposits at certain intervals. The formation of these deposits spoils machine parts and imbues washable items with unpleasant odors. The approximate level of contamination of the machine can be seen under the hatch cuff at the point where it connects to the device tank. To do this, you just need to open the hatch and lift the edge of the elastic band;
- After using the device, unplug it from the outlet and turn off the water supply tap to it. It is also necessary to correctly connect the washing machine when installing it for the first time. An important step is connecting the device to the sewer; it should not provoke spontaneous outflow of water during washing and its entry from the sewer system.
- How to wash red wine from white clothes
- How to remove blood from clothes
Part replacement procedure
The design of the machine allows the unit to be pulled out through the top, so there is no need to remove the front panel of the case. To freely remove the tank, you need to remove the washer cover, upper counterweight, dispenser, control panel, level sensor, intake valve, back wall, drive belt, remove the heating element and motor, disconnect the drain pipe, loosen the shock absorbers.
Next, the extracted unit is placed on a flat surface and disassembled. Atlant machine guns have a collapsible tank; there is no need to saw it. Bearings are replaced according to the following algorithm:
- unscrew the bolts holding the front counterweight, remove the block;
- loosen and remove the inner clamp of the cuff, tuck it in so as not to stain the elastic during disassembly;
- Unscrew the screws holding the two parts of the tank, remove the top and put it aside;
- turn over the bottom half;
- disconnect the pulley by unscrewing the central screw. If you cannot loosen the bolt, treat it with WD-40 aerosol;
- remove the drum by lightly hitting the bushing;
- using a hammer and chisel, knock out both bearings;
- clean the seat from dirt;
- install the small bearing into the groove. Tap on its outer ring so that it “fits” well into the “socket”;
- install a larger bearing in the same way;
- Place the oil seal on top, after treating it with a special lubricant.
- How many bearings are there in a Zanussi washing machine?
- Which bearings are best for a washing machine?
- What bearings are in the washing machine?
- How many bearings are there in an Indesit washing machine?
- Reviews of Atlant washing machines
- How many bearings are there in a washing machine?
Once the bearings and seal are installed, all that remains is to assemble the assembly. It is advisable to treat the tank halves along the edges with a moisture-resistant sealant and only then connect them with bolts. Next, all the removed parts are fixed in the housing in the reverse order.
Interesting:
We disassembled such a washing machine and the smaller bearing turned out to be France 206B Explorer, i.e. 6201-2rsh. Explain why? The washing machine was purchased in 2009. Another mechanic changed the bearings before us, was it his mistake or what?
Bearing replacement
The advantage of Atlant washing machines is that they have a collapsible tank. This greatly simplifies the work of replacing the bearing.
To change the bearing you need to:
- Unscrew and remove the front counterweight.
- Unscrew the fasteners that connect the parts of the tank. Remove and stow front half.
- Turn the tank over so that the pulley is on top, unscrew the retaining bolt, remove the belt and pulley.
- Remove the drum from the tank.
- Knock out the shaft.
- Pull the oil seal out of the hub.
- Use a hammer and chisel to knock out the bearings.
- Thoroughly clean the area where the parts will fit, wipe dry, and lubricate with WD-40.
- Drive in the bearings one by one by lightly tapping with a hammer (the first one is external).
- Apply lubricant to the new oil seal, and then install it in its original place.
The bearing installation is completed, you can begin assembling the Atlant washing machine. It is first recommended to inspect the remaining parts and carry out the necessary maintenance, for example, descaling the heating element.
When assembling the tank, the joints must be carefully treated with sealant, only then screw in the bolts. When choosing a sealant, keep in mind that it needs to withstand elevated temperatures and aggressive conditions, so it must be of high quality. This will help protect your washing machine from leaks. Also, sealant should be used when connecting pipes.
After the Atlant washing machine is assembled, it should stand for the time necessary for the sealant to harden in accordance with the manufacturer’s recommendations. After this, you can connect the machine to water and sewerage, turn it on, add a small amount of powder and perform a test wash. This is necessary to remove dirt and unpleasant odors that appear when using sealants and lubricants.
If during a test run the washing machine runs quietly and no moisture appears underneath, this indicates that the bearing has been replaced correctly.