Probably every family uses an automatic washing machine, and no one can even imagine being left without its help. But over time, it may also happen that the washing machine stops heating the water, for unknown reasons, the program time lengthens or the quality of the washes deteriorates.
If your assistant experiences such symptoms, it means that it is most likely necessary to install a new heating element on the Indesit washing machine due to the old one failing. The fact is that when the heating element is not working, the effectiveness of detergents deteriorates, programs become longer because the processor does not understand why the required water temperature is not there, and if there is a breakdown on the heater body, the Indesit washing machine may turn off completely.
You can find out how much it costs to replace a heating element for an Indesit washing machine in any specialized workshop, but if you have skills in repairing any equipment, you can solve this problem with your washing machine yourself.
Replacing the heating element of an Indesit washing machine will require a little time, tools and patience.
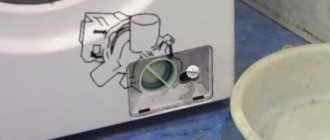
On all models of this brand of product, the heater is located in the rear of the tank; to access it there is a removable part of the device body and therefore complete disassembly of the washing machine is not required.
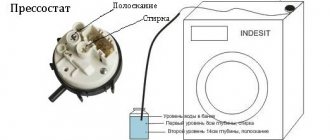
Signs of a malfunctioning pressure switch
If the water quantity sensor is faulty, the following signs indicate this:
- The washing machine turns on the heating element without water, this will lead to overheating and damage to the heating element.
- There is very little water in the drum or, conversely, an excess, in some cases it can leak out.
- Rinse does not work or water is not poured in or fluid is pumped out incorrectly.
- There is a burning smell and the heater fuse trips.
- After spinning, things are very wet.
- After draining, some liquid remains in the tank.
Many manufacturers, for example, Samsung or LG, install a self-diagnosis system in their devices. If a sensor malfunction is detected, the equipment displays a special code or reports the type of failure by flashing the indicators in a certain sequence. You can decipher this information using the user manual.
Checking the solenoid relay
When the battery is charged, but the engine does not start, you need to check the starter.
If the generator spins but the engine does not, then in such cases it is necessary to check the solenoid relay of the electric motor and the bendix. To do this, you need to remove the starter. After this, all contacts are cleaned, and the resistance of the relay winding is measured with a multimeter.
If the value is infinity, then the winding has burned out. In this case, it is necessary to rewind the coil or replace it. The device shows several tens of ohms, which means the winding is intact.
Then its performance is checked. The positive terminal of the battery is connected to the corresponding relay terminal using the cigarette lighter. And the minus is connected to the starter housing. A click should be heard, then the device is working properly, otherwise it needs to be disassembled and the mechanical part checked.
How to check the pressure switch of a washing machine
If, after starting one of the programs, there are signs indicating a breakdown of the water supply sensor, you should not immediately go to the store and purchase a new one. First you should check the serviceability of the pressure switch to make sure that the reason is really in it.
To find a device:
- Disconnect the equipment from the network, turn off the liquid supply.
- Slide back, remove and set aside the top cover, after unscrewing the retaining screws.
- The pressure switch is usually located on the side or rear wall of the washing machine.
- Disconnect the wiring secured by the latch.
- Disconnect the hose attached to the tube with clamps.
- Unscrew and remove one or more screws holding the part in place.
- Inspect the sensor; it should not have external damage.
- Check the tube: if it is clogged with dirt, it must be cleaned and rinsed; if it has cracks, it must be replaced.
- Inspect the contacts of the pressure switch and clean if there is dirt on them.
- Select a short hose 10-15 cm long in diameter and connect it to the pressure switch.
- To check, you need to bring the sensor to your ear and blow forcefully into the hose. If the user hears clicks, this means that the contacts inside the device are working properly. Otherwise, this indicates a malfunction.
To make sure that the part is broken, you need to check the pressure switch with a multimeter. On it you need to set the resistance measurement mode, and then connect the measuring device to the sensor. To find out which contacts to connect the multimeter to, you will need an electrical diagram of the pressure switch. Then you need to blow into the hose. If the device is working, the indicators on the display will change. Otherwise there will be no changes.
What should the owner do?
If, after completing a full wash cycle, the wrung out laundry is warm to the touch, you cannot start the washing machine again because the heating system is faulty. Failure may occur due to damage to the heating element. This means that there is a high probability of current leakage onto the device body.
In this case, the owner must immediately, carefully, without touching the machine, disconnect it from the power supply. Then you should call a specialist. If this is impossible to do for some reason, the work of checking the electric heater and temperature sensor can be entrusted to a man.
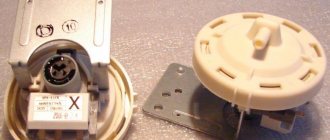
Replacing the pressure switch
If the pressure switch does not work, it needs to be replaced. The sensor cannot be repaired because it has a solid body. The new device must be identical to the broken one. You can buy it at the manufacturer's service center, in a store or online. In order not to make a mistake when choosing, you should indicate when purchasing the name and model of the washing machine or the identification number of the sensor, if it has one.
To install a new pressure switch, you need to complete the following steps:
- Install the device in place of the old one and fasten it with screws.
- Connect the hose to the tube and secure with a clamp. First check the hose for damage or contamination. If necessary, replace or clean.
- Connect the wiring.
- Install the top cover and tighten the screws.
- Plug in the plug and open the liquid supply.
- Place laundry in the drum and turn on the wash to check the functionality of the sensor.
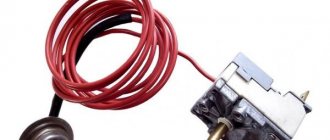
Thermistor test
Sometimes washing machines heat up the water during rinsing if the thermistors are faulty. They fail less often than heating elements, but they are worth testing from time to time. In addition, removing the temperature sensor from the housing is easier and faster than the heating element, and it is more logical to carry out repair work from simple to complex. The thermostat is located inside the heating element, which in most models is installed in the lower part of the housing. To test the washing machine thermistor, you need to perform the following steps:
- disconnect the device from the power supply;
- remove the rear panel of the machine;
- find the wires that go from the temperature sensor to the external temperature controller. Separate them;
- the screw that holds the tubular electric heater must be loosened;
- remove the sensor from the heating element.
You can handle this work yourself. To check the thermistor you will need a multimeter. Use it to check resistance. They do it like this:
- set up the measuring device to determine resistance;
- attach the probes to the thermistor contacts and check the readings.
Important! The resistance value at an ambient temperature of +200C should be approximately 6000 Ohms.
- then the sensor is immersed in heated water and the resistance reading is observed as the temperature changes. It should get lower.
If the temperature is +500C, then the resistance value in a working thermistor is approximately 1350 Ohms. If a breakdown occurs, the sensor must be replaced. Installing a new part and assembling the washing machine is carried out in the reverse order. The device is connected to the mains last.
Setting up the pressure switch
To set the optimal water flow when operating the washing machine, the pressure switch must be adjusted. The adjustment is usually performed by the manufacturer, but the same steps can be performed independently after replacing the sensor.
The pressure switch has adjusting screws that need to be turned half a turn. In this case, the washing machine should not be connected to the network, and the water should be turned off. After each turn, you should replace the cap and check the amount of liquid being poured. When the optimal level is reached, the adjustment can be completed. It is recommended to secure the screws with a sealing substance so that they do not turn randomly when wrung out.
Checking the starter regulator
To check the starter regulator relay without removing it from the car, you can use a multimeter and test all the wires that go to it. To do this, they are first disconnected from the regulator. The multimeter is switched to resistance measurement mode, the disconnected wires are checked.
If everything is normal, then the conductors are returned to their place. The voltage at the battery terminals is measured with the engine off. The multimeter is switched to DC voltage measurement mode in the range from 0 to 20 Volts. The probes attach to the battery terminals. The device should show 12.2-12.7 V.
If 12 volts or lower, then it needs to be recharged.
Then the engine must be started and checked again with the same measurements. If the voltage is in the range of 13.2-14 V, then this is normal. We add engine speed to 2000 per minute and measure again. Normally, the multimeter should show between 13.6-14.2 V. We also add revolutions to 3500 per minute.
We take readings. They should not exceed 14.5 Volts. If the value does not change and remains 12.7 Volts, as when the engine is turned off, or even decreases, then the regulator relay is faulty. Therefore it needs to be replaced. If 14.5 Volts are exceeded, the regulator must also be changed.
Sometimes the question arises of how to test a relay with a multimeter if there is no access to the regulator. Then you need to remove it, and to check it you must have, in addition to the tester, a charger with a voltage regulator and a light bulb.
The following scheme is assembled from them. The charger is connected to the input terminals of the regulator, and the light bulb is connected to the output (thick) terminals. A multimeter monitors the voltage at the regulator input. By charging we change the voltage from 12 to 15 volts. The light should go out at 14.5 volts. If this does not happen, the regulator is faulty and must be replaced.
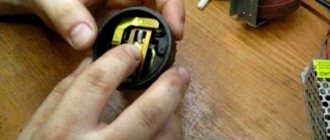
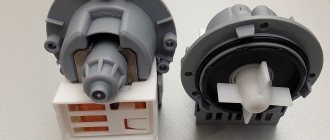
Design and principle of operation of the device
Before checking the part, it is recommended that you familiarize yourself with its design features and operating principle. A pressure switch is a part that is responsible for controlling the volume of water in the washing system. Different operating modes of washing equipment require different amounts of water. Therefore, when switching, a level switch is used to check the amount of liquid in the tank.
The part is made of high-quality plastic and has a round shape. It connects to electrical wiring and a hose to determine pressure. Inside there is a switch with a thin membrane. When the system is filled with water, pressurized air will flow through the hose, causing the switch to close. After this, the system will stop taking in new fluid.
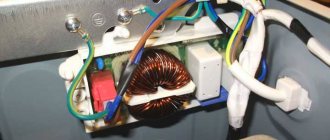
Electrical circuit malfunction, wire breakage or disruption.
When the washing machine is running, many wires come into contact with different parts. This may cause wires to break due to friction. Due to operating vibration, the mounting sockets may become detached. To identify these faults, you need to thoroughly inspect all electrical wiring. Such an inspection will help find faults or breaks. Unclear places can be checked and ringed with a multimeter.
Write comments, additions to the article, maybe I missed something. Take a look at the site map, I will be glad if you find anything else useful on my site.
Symptoms of a problem
Sometimes it is quite difficult to determine the malfunction of a product, especially for people who do not understand technology. It is recommended that you familiarize yourself with the common signs that indicate a faulty pressure switch.
Stops drawing water into the tank
People who have their own washing machine often experience that liquid stops filling into the tank. There are several reasons for this problem:
- Problems with the valve responsible for supplying water. Liquid enters the system under tap pressure. The supply is opened using a special built-in valve, which begins to operate after a signal from the control module. If it is faulty, the liquid will not begin to flow.
- Control module failure. Due to a malfunction of this part, the valve does not receive a signal, and it does not begin to draw water.
- Blocker failure. He is responsible for blocking the hatch door. If the lock is faulty, the machine will not start working.
However, the most common cause is considered to be a faulty pressure switch. If this product does not work, the machine will not be able to evaluate and will not begin to fill the tank.
Repeated cycles of water supply and drainage
Modern washing machines are equipped with an automatic liquid collection system. Not only valves, but also level switches are responsible for the flow of water. All these parts function using special commands coming from the control unit.
A failure in one of the listed parts results in the system not being filled with the required amount of fluid.
The control unit perceives this as a failure to comply with the command, and therefore it re-sends the signal to supply water. This results in the supply and drain cycles being repeated many times. Due to repetition of cycles, the washing time can increase significantly.
Reduced rinse and wash quality
Sometimes, after using a washing machine for a long time, the quality of rinsing and washing clothes gradually deteriorates. Many people attribute this to the use of inappropriate powders. However, there are other reasons why things begin to wash worse.
A common reason for poor washing quality is a faulty level switch. Due to the breakdown of this part, the washer cannot determine how much water is in the tank, and because of this, it often does not fill completely. This leads to the fact that the collected liquid is not enough to properly wash and rinse the washed items.
Water remains after finishing washing
There are times when, after completing work, some water remains inside the drum. This can happen because the pressure switch has failed and stopped functioning normally. If it does not work correctly, the control unit of the device will not receive a signal about the need to clean the tank. This will lead to the pumps not starting to work to pump out excess water.
However, there are other reasons for this problem:
- Pump filter clogged. Obstruction of liquid from the tank sometimes occurs due to a clogged filter. It will have to be cleaned for the drain to start working.
- There is a blockage inside the pipe. During the draining process, the waste liquid passes through the pipe. Experts advise cleaning it once a month to prevent it from becoming clogged.
Sensor Test Guide
Before trying to check the pressure switch on a Bosch Maxx 4 (or Samsung) washing machine using a tester or improvised means, you should weigh the validity of this action. If the washing machine is under warranty, unauthorized interference with the operation of the unit will be grounds for refusal of warranty service by the seller or manufacturer.
Sequencing:
- Unplug the power cord from the outlet.
- Remove the top panel by removing the two small screws located on the back wall and sliding the panel back and up.
- Find a sensor cantilevered to one of the walls of the housing.
- Remove the connector, release the fastening (screw), and remove the sensor hanging from the tube from the machine.
- Using pliers, open the clamp on the supply tube and remove the device.
Water level switch
Before checking the adjustment of the device using tools, you can evaluate the overall performance of the sensor. To do this, you will need a piece of tube identical to the rubber tube of the relay. Having pulled the device out of the machine, you need to connect it to a short tube, blow strongly into it and determine whether the relay inside the device clicks in response to a change in pressure. If not, the sensor is faulty.
Consequences of ignoring the problem
Failure of the pressure switch leads to serious consequences, which should be familiarized with in advance. If you do not replace the broken part in time, the following problems will appear:
- Water does not fill up. If the level switch is broken, the liquid stops collecting. In this case, the heating element may turn on, which will lead to further damage to the heating element. Therefore, before starting washing, be sure to check that the tank is not empty.
- Deterioration in wringing out washed items. Sometimes, due to a component failure, the fluid stops draining normally. Because of this, things turn out much worse.
- Tank overflow. Sometimes, due to a broken part, too much water is pumped into the tank, causing it to overflow.
Operating principle
Essentially, a relay is an electromagnet. When control voltage is applied to the coil, the rod attracts the armature, thus switching the circuit.
There are three types of relays:
with normally closed contacts;- with normally open;
- throwing over.
When a control signal is applied to a device with normally closed connectors, they open; if there is no signal, they close. For relays with open connectors, the opposite is true. There is voltage on the winding, the terminals close, but when there is no voltage, it opens.
In flip-over models there are two sets of connectors, one normally closed and the other normally open. They have a common terminal. When current is applied to the winding, the contacts switch from one position to another.
How to check the sensor
To make sure the sensor is working, you need to check it. There are several useful recommendations that will help you check the serviceability of the part.
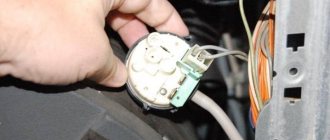
Where is
Before proceeding with dismantling, you should understand the location of the product. Many washing machine owners mistakenly believe that the part is located inside the drum, but this is not the case. Most manufacturers install a level switch on top of the drain body, which is mounted near the side wall. This arrangement is considered very convenient, as it simplifies the removal of the product from the structure.
However, on some models the sensor may be installed in other locations. For example, in modern models of Samsung or Ariston washing machines, the part is installed on the right near the front wall. For cars, the relay is located in the central part of the left side wall.
How to dismantle
It is quite easy to dismantle the pressure switch yourself. However, despite this, you need to familiarize yourself with how to do it correctly. The dismantling process is carried out in several successive stages:
- Removing the top cover. To get rid of it, you will have to unscrew two bolts that are located on the back wall. The top cover is then carefully slid back and removed.
- Detaching a part. The relay is connected to wires leading to the control unit and a hose. Before removing the product, you must carefully disconnect the wiring and hose.
- Removing the pressure switch. It is connected to the wall with mounting bolts that must be unscrewed.
Checking with a multimeter
There are different methods for checking the functionality of a device, but most often they use a multimeter for this.
Before you begin testing, you must carefully study the electrical circuit of the device and carry out preliminary setup of the tester.
It is set in advance to resistance mode, after which the probes are connected to the contacts of the removed part. After connecting the probes, the values on the tester display should change. If the numbers have not changed, then the relay is faulty and will have to be completely replaced with a new one.
Hf3fa/012-htf (135) Electrical relay 12 v 10a with 4pin
Peculiarities:
- 15A switchable
- 1 form A 1 form C configuration
- Subminature, standard printed circuit board diagram
- Sealed IP67 and Flow Proof Available Types (RoHS Compliant)
- Dimensions: (18.7*15*15.2) mm
| Contact location | 1A | 1C | |
| 100mΩ (1A 6VDC) | |||
| contact material | AgSnO2, circuit protection | ||
| Contact rating | 0.36W/0.45W | 10A 250VAC/7A 28VDC/15A 125VAC | |
| 0.6W/0.8W/0.92W/1W | 15A 14VDC | ||
| Max. Switching voltage | 250VAC/28VDC | ||
| Max. switching current | 15A | ||
| Max. Switching power supply | 2500VA/210W | ||
| Mechanical endurance | 1000000 times | ||
| Electrical endurance | 100000 times | ||
Characteristics:
| Insulation resistance | 100MΩ (500VDC) | |
| Dielectric Strength Tester | Between the reel and contact us | 1500VAC 1 min |
| Between contacts | 750VAC 1 min | |
| Operating time (at normal voltage) | ≤10ms | |
| Release time (normal. Volt.) | ≤10ms | |
| Impact resistance | Functional | 100 m/s² (10 g) |
| Destructive | 1000 m/s² (100 g) | |
| Resistance to oscillatory motion | 10 Hz | |
55 Hz 1.5 mm
85% relative humidity
105 ℃
Dielectric strength requirements 0.6 W and above 500 V AC 1 min
Ourline Dimensions, Wire Diagram and PC Board Layout:
Q1. What are your packing terms? A: Generally, we pack our goods in neutral white boxes and brown boxes. If you have a legally registered patent, we can pack the goods in your branded boxes after receiving your authorization letters.
Q2. What are your payment terms? A: T/T 30% in advance and 70% before shipment. We will show you photos of the products and packages before you pay the balance.
Q3. What are your delivery terms? A: EXW, FOB, CFR, CIF, DDU.
Q4. What about the delivery time? Answer: Generally, it will take 30 to 60 days after receiving your advance payment. The specific delivery time depends on the items and order quantity.
Q5. Can you produce according to samples? A: Yes, we can produce your samples or technical drawings. We can build molds and fixtures.
Q6. What is your sample policy? A: We can supply sample if we have ready parts in stock, but customers need to pay the sample cost and courier cost.
Q7. Do you test all your goods before delivery? A: Yes, we have 100% test before delivery
Q8: How do you make our business long term and good relationship? A: 1. We keep good quality and competitive price to provide our customers with benefits; 2. We respect every customer as our friend, and we sincerely do business and be friends with them, no matter where they come from.
Do-it-yourself manual adjustment
If the breakdown turns out to be minor, you don’t have to buy a new part, but simply manually adjust the old one. When setting up, adhere to the following recommendations:
- It is necessary to determine the optimal amount of water for the washing machine. For each model there is an optimal volume of liquid that is needed to complete the programs. Therefore, it is necessary to find out in advance how much water should be poured into the tank for washing and rinsing things.
- Configure. On the surface of the product there are adjustable screws that are adjusted depending on the required amount of liquid.
Where is the heating element located?
Replacing heating elements in Indesit brand washing machines is quite simple if you know how to hold a screwdriver and use a multimeter. In different cars, you have to get to the heating element in different ways when disassembling the equipment. Italian manufacturers took care of their consumers and installed the heating element in such a way that it can be reached by opening the back cover of the machine.
That is why such repairs are considered simple. The only drawback is that the washing machine is disconnected from all communications. This is necessary in order to turn the machine around at the back for repair work.
How to replace it yourself
In case of more serious damage, you will have to replace the broken product. However, before replacing, you must purchase a new pressure switch. To do this, you will have to take the broken product with you to the store and buy exactly the same one.
Replacing a part is carried out in several successive steps:
- Removing the old relay. To remove the broken part, all wiring and hoses are disconnected. This must be done very carefully so as not to accidentally damage anything. Then the mounting bolts that secure the housing are unscrewed.
- Installing a new relay. The structure is bolted in place of the old one. Then a hose is attached to it using a clamp and the electrical wiring is connected.
Disassembly for replacement on top-loading models
In these machines, to get to the place where the part is replaced, you need to:
- Remove the right removable part of the housing;
- Turn the product towards you with this side;
- Unscrew the screws from the end on the right;
- Remove the plastic false panel from the lower front part and unscrew the 2 long screws under it;
- Then remove the lid, moving it to the right and at the same time downwards;
- To make it easier to check and replace the part, you can remove the belt; when reinstalling it, carefully place it correctly on the pulleys so that it falls off during operation.
Operating rules
To prevent the pressure switch from breaking, you must use washing equipment correctly. There are several operating rules that should be followed when using the machine:
- The machine cannot be used idle. Before starting the wash, the drum is filled at least halfway. If it is empty, the pressure switch will quickly break.
- Wash in warm water. Its temperature should not exceed forty-five degrees.
- Clean the drain regularly. To ensure that water drains well from the tank, you need to clean the drain hose once a month.
Manual sensor adjustment method
If the user of household appliances is not satisfied with the water level that the LG, Ariston or other company’s washing machine draws for washing, it can be increased or decreased by adjusting the relay actuation force. Before making adjustments, you should unplug the washing machine, remove the top cover and disconnect the connector from the sensor.
The pressure switch has three adjusting screws. They are visually identified by the presence of a colored filling compound in the slots. The required screw that controls the primary force is located in the middle of the relay body. The slot of the screw is usually for a Phillips screwdriver, or “star”.
Manual setting of water sensor
The adjustment must be made on an empty tank. The process occurs in stages with intermediate visual checks of the water level: turn the screw - assembly, connection - test and then based on the results. It is recommended to turn the screw no more than half a turn at a time: the relay contact travel is very small.
It is recommended to check, change, and adjust the water level sensor only if you have basic technical skills and theoretical knowledge; otherwise, you should seek the services of professionals.
How to check the pressure switch of a washing machine if you don’t have extra money to call a technician? If the warranty on your washing machine has expired, you can do it yourself. However, before you check the pressure switch of the washing machine, you need to know where it is located, what it is and understand the principle of operation of the water level sensor.
Malfunctions of SMs equipped with a drying function
If code F13 appears on the display, this means that there is no signal from the drying temperature sensor. During diagnostics, an open or short circuit in the sensor circuit is detected. A working temperature meter should have a resistance within 40 kOhm. Causes: sensor malfunction or contact failure in the connecting circuit.
If there is a break in the circuit of the heating element intended for drying clothes, the reasons for the breakdown are the same - failure of the heater or failure of contact in the connecting circuit. A malfunction of the relay that turns on the heating element for drying may occur. The heater does not turn off, which indicates either a stuck relay or a broken contact in the connecting cable.