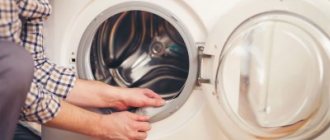
For front automatic washing machines, the tightness of the hatch is of great importance. In addition to the fact that a water leak is a serious nuisance in itself, water may well get inside the car. And this can lead to much more serious problems that can affect both the performance of the machine and the safety of its operation by the user.
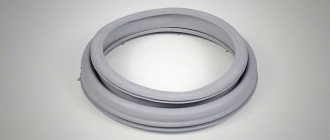
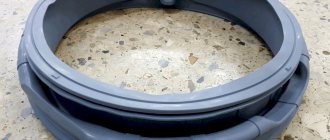
The most common cause of depressurization of the washing machine hatch is a violation of the integrity of the rubber cuff. It is this that acts as a seal between the machine’s tank and its loading hatch. The formation of rubber defects on this same cuff inevitably leads to the need to replace it.
The cost of this washing machine part is quite low. And most owners of automatic washing machines can easily replace it themselves. The main thing is to know how it's done. Well, we can easily deal with this further.
What is a sealing cuff and its purpose
This part of the washing machine ensures reliable sealing of the unit between the tank and the body, as well as for tightly closing the hatch door.
The loading hatch cuff is an element made of heat-resistant silicone rubber, which is highly resistant to water.
How to remove the first clamp?
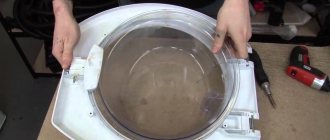
To remove the rubber seal, you will need to remove the clamp that secures it to the front wall:
- To do this, you need to find a metal spring and plastic holder on the side of the cuff.
- The metal clamp is dismantled by unscrewing the small retaining screw and pulling the spring towards itself, after prying it off with a flat screwdriver.
- The plastic holder is pulled out beyond the area where the locks are located.
Now you can easily detach the edge of the cuff from the front wall.
How to protect your washing machine cuff
The following recommendations should be observed:
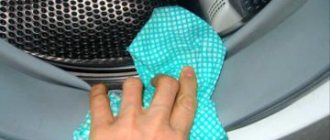
- After each wash, wipe the rubber surface dry, not allowing water to stagnate in the recesses and grooves of the cuff;
- Leave the hatch door of the washing machine slightly open, thereby preventing the formation of mold and mildew in the internal cavity of the rubber;
- Do not use chemicals when washing that are not recommended or prohibited by the manufacturer;
- Select the required washing mode that provides the best final result at the minimum water temperature;
- When loading laundry, make sure that the items are completely loaded into the drum;
- Adjust the level if the washing machine vibrates a lot.
Installation of a new cuff
Before you begin directly replacing the rubber band in the washing machine, it is important to compare the old and new parts. They must be identical in size. Before installation, you must mark the seats, upper and lower marks.
The top point is usually marked by manufacturers with a triangular protrusion. When replacing the rubber band in the washing machine, it aligns with the mark on the tub.
There are holes for draining water at the bottom of the cuff.
It is very important to carry out installation strictly according to the marks. Otherwise, the seal may become dislodged or damaged during installation.
Direct installation starts from the top edge:
- Holding the installed area with one hand, tuck the cuff into the grooves with the other hand.
- Then slide the inner edge completely onto the tank.
Despite the fact that replacing the rubber band in an Indesit washing machine can be done without dismantling the front panel and cover, partial disassembly of the case can still help a non-professional. For example, through the opening, after removing the upper part of the housing, a better view opens, which will allow you to assess the correct installation of the cuff.
Causes of damage to the hatch sealing rubber
Reasons why the integrity of the cuff is damaged:
- Ordinary negligence. It is very easy to damage the soft rubber seal by metal parts present on the clothes when placing the clothes in the drum. These could be locks, sharp buttons or rhinestones. To prevent this from happening both when loading clothes and during the washing process itself, it is recommended to turn the clothes inside out so that everything that could damage the elements of the washing machine ends up inside the clothes.
- Natural wear and tear. The cuff is in constant contact with both the loading hatch and the clothes in the drum. Natural mechanical wear of its surface occurs.
- Constant contact with salts and detergents dissolved in water changes the structure and physical properties of rubber, water stagnates in the rubber and mold appears.
- High temperatures, as well as temperature changes, aggravate the process, resulting in cracks and breaks, which lead to water leakage.
- The rubber of the door hatch may rub against the counterweights during operation, which will also inevitably lead to damage.
- Poor quality maintenance. If you constantly forget to wipe the rubber seal after use or leave the loading hatch closed for a long time, you are guaranteed to shorten the service life of the rubber seal. Limescale or mold begins to form in the internal cavity. Loss of sealing properties can occur due to leaving the washing machine for a long time in severe frosts in an unheated cottage or house.
Preliminary inspection and preparation
If you decide to repair the cuff yourself (for example, there is no money to buy a new one or there is no suitable option in the store, but you need to wash it), then you should carry out a list of preparatory measures that will help avoid unpleasant surprises later.
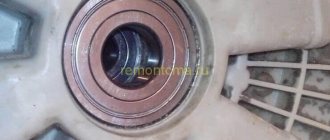
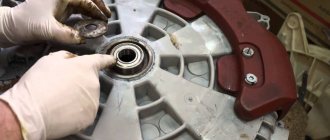
The first step is to thoroughly inspect the cuff and determine the feasibility of gluing it, as well as the extent and cause of the damage. To do this, you need to remove the spring clamp that holds the cuff itself. In some washing machine models, you will need to remove the entire front cover, and sometimes even remove the drum.
An analysis is then performed to determine whether the cuff needs to be removed. If the damage is accessible and located on top, then you can seal the cuff without removing it. In some models, in order to remove the cuff, you will also need to dismantle the drum, so you need to soberly assess your strength regarding reassembly. It may be better to contact a specialist or a more experienced person.
Finally, the patch and glue are selected. If you don’t have thin rubber on hand, you can use a condom or a medical glove, which should be folded several times. The glue must have good adhesion and elasticity.
Many people are satisfied with the results of using instant rubber and shoe adhesives.
Replacing the cuff of the washing machine hatch
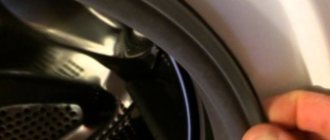
If cracks or leaks appear on the rubber band, it must be completely replaced. In some cases, repairs can be made by applying rubber patches using waterproof adhesive. You can use the method of turning over the rubber cuff, damaged (hole) in the upper part of the hatch. This can be done if the damage is minor, but keep in mind that water will constantly accumulate in the seals, since the entire cuff has a drainage compartment. To remove the rubber band from the washing machine you need to:
- Prepare two flat screwdrivers and one Phillips screwdriver for disassembling the front side.
- Use one of the screwdrivers to pry up the front metal clamp and remove it in a circle, while helping with the second screwdriver.
- Unscrew the two bolts holding the door locking device.
- Remove the top cover, then the front facing panel of the washing machine to provide access to the fastening parts (optional).
- Loosen the clamp by unscrewing the tension bolt. A Phillips screwdriver is usually suitable for this.
- Carefully, so as not to damage the cuff, pry the clamp with a flat-head screwdriver and remove it from the grooves.
Depending on the model of the washing machine and the manufacturer, the operations for removing rubber from the drum of the washing machine may differ slightly, but the general algorithm of actions is the same.
Subtleties of cuff repair
It is not always possible to purchase new replacement material. Therefore, they repair the old one, but for this you need to know all the intricacies of repair.
When repairs may be needed
There are rare models of equipment for which it is difficult to find a suitable seal, so it is better to resort to repairing the cuff of the washing machine.
Recovery is also possible if the cuff is torn on the side or top. Then you can seal it instead of buying a new one.
How to select and prepare a cuff
When selecting a new seal, be sure to take into account what brand it belongs to.
If repairs are being made, you first need to find out the cause of the damage. Then select the material to apply the patch.
The patch should be strong and flexible. Rubber gloves may be suitable for this, but it is better to use material for sealing inflatable pools. The glue needs to be waterproof, for rubber products, and after drying, it will give flexibility and not dry out.
Instructions for sealing the seal
If gluing needs to be done in an inaccessible area, then for convenience you need to remove the part from the tank.
In order for the gluing process to give a positive result, you must follow the instructions:
- Preparing the patch. The material is folded into a series of layers that are glued together. Then the required patch size is cut out. It should be about one and a half times larger than the crack.
- Degreasing the gluing area and the material itself. The area should be degreased with maximum overlap around it. Alcohol and solvents are used for work.
- Allow it to dry for a few minutes.
- Apply glue to the gluing area and to the material. Considering the instructions for the glue, wait a while.
- Place the surfaces to be glued together and press down.
- Wait until completely dry. Complete drying occurs within 24 hours.
- Correctly install the part in place.
It is possible to combine gluing with stitching the gap. In this case, the tear is sewn together with artificial thread, and then a special sealant is applied to the seam and left for a day. Afterwards it is possible to install the part in its original place.
Prevention of cuff damage
Following simple measures when operating the washing machine will help avoid damage and premature wear of the rubber seal:
- Before washing, be sure to check the pockets of items loaded into the drum. Place the laundry carefully, without compacting it.
- Before starting the program, check the grooves of the hatch rubber. Various objects, including metal ones, often end up there.
- Items of clothing with metal fasteners, zippers, and pointed decorative elements should be washed in special mesh bags. This will prevent damage to the cuff and ensure gentle washing of items.
- Avoid overloading. This leads to objects being pinched by the car door and, as a result, damage to the rubber band.
- Use only washing, bleaching, softening and cleaning products recommended by the manufacturer.
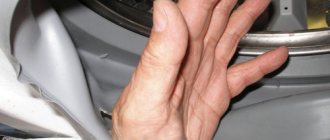
Installation of the internal clamp
This is the most difficult moment in replacing the rubber band in the washing machine. You should begin installing the clamp only after the technician is convinced that the cuff is installed correctly:
- For convenience, it is recommended to unscrew the bolts holding the hatch locking structure.
- A screwdriver should be inserted through the locking hole, hooking the clamp, thereby securing it for further work.
- Then you can start stretching it around the perimeter in any direction. During operation, it is important to control the tension force and fixation. If you move it carelessly, the screwdriver may turn and the clamp will come off - you will have to do the whole job again.
- Once the clamp is in its seat, you need to slowly pull the screwdriver out of the locking hole.
- Now you need to feel the cuff and clamp for correct installation. The spring should be pressed tightly into the seat.
Required materials and tools
An elastic band can become unusable for several reasons:
- wear and tear from long-term use;
- mechanical damage from metal objects caught in the drum. Most often these are keys, paper clips, screws, coins, etc. forgotten in pockets;
- pinching of laundry when closing the door, which can lead to rubber rupture;
- inaccurate removal of washed items, in which metal elements (zippers, buttons) can damage the item;
- exposure to caustic chemicals used in violation of operating instructions to bleach laundry or clean the drum.
Before changing the rubber band on the washing machine, you need to prepare:
- A rubber sealing collar that matches the specifications for the model of the machine being repaired. On the Internet there are tips for minor damage: reinstall the seal so that the defect is above the water level in the drum. You can’t do this - the cuff can break at any moment.
- Screwdriver, power screwdrivers for unscrewing oxidized screws.
- Open-end and box spanners. Useful for removing counterweights.
- Liquid soap to reduce friction when installing the seal on some models.
- Wiping cloth.